|
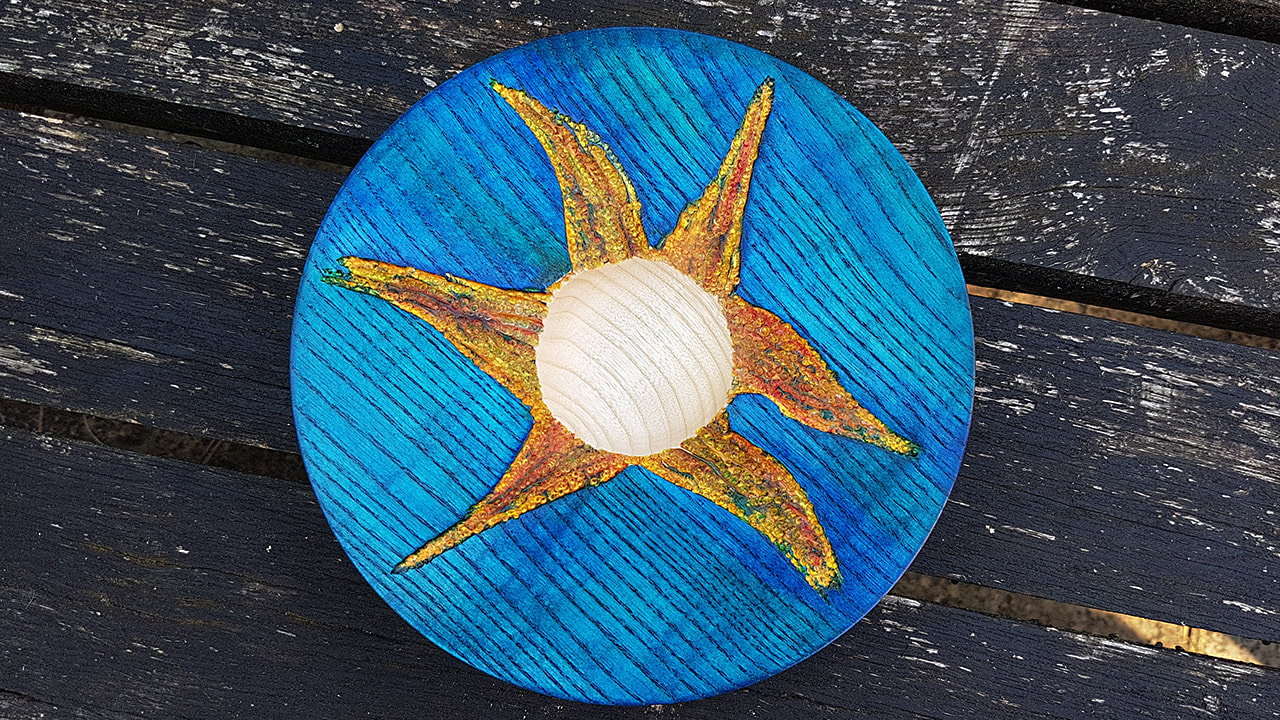
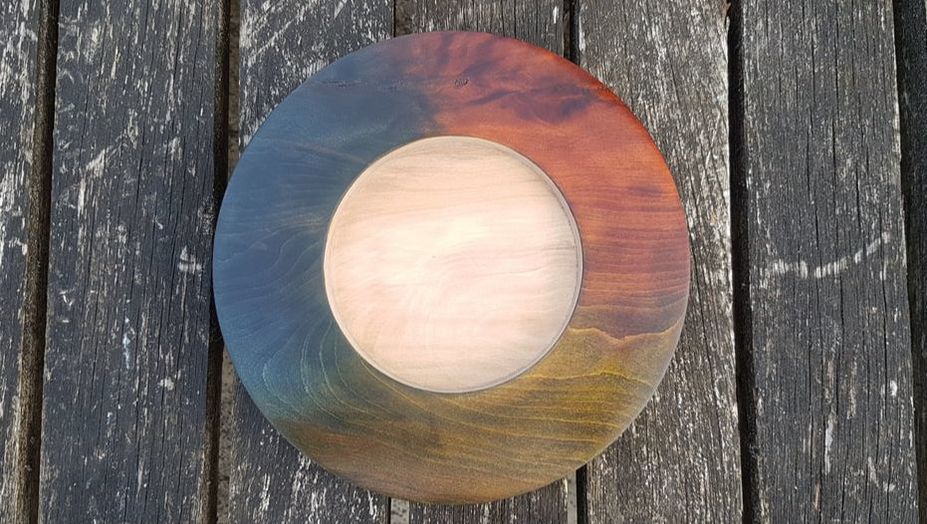
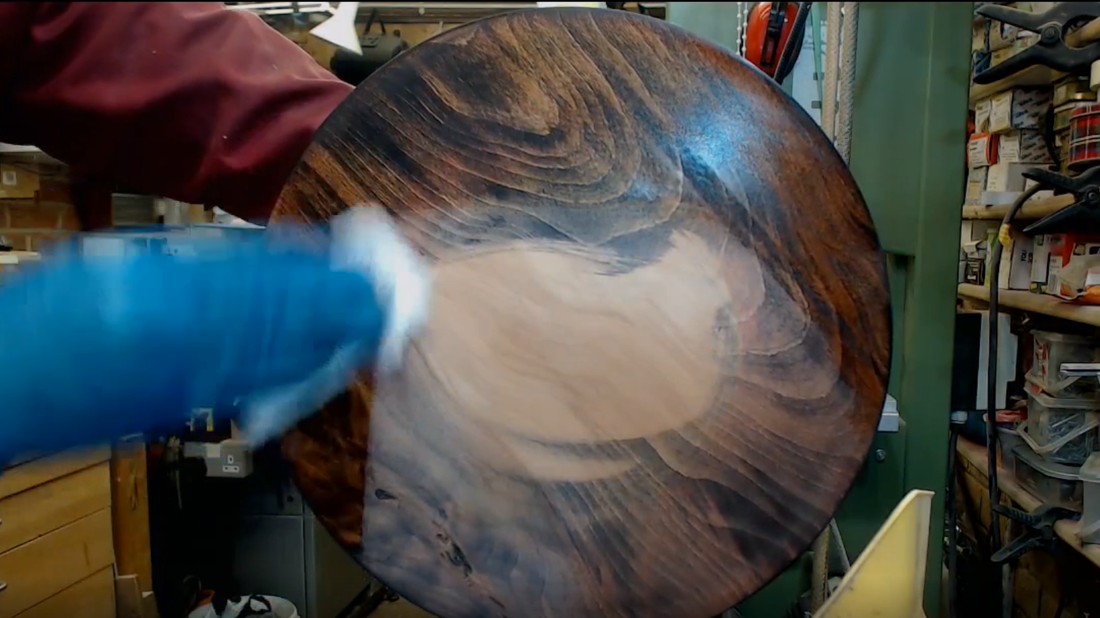
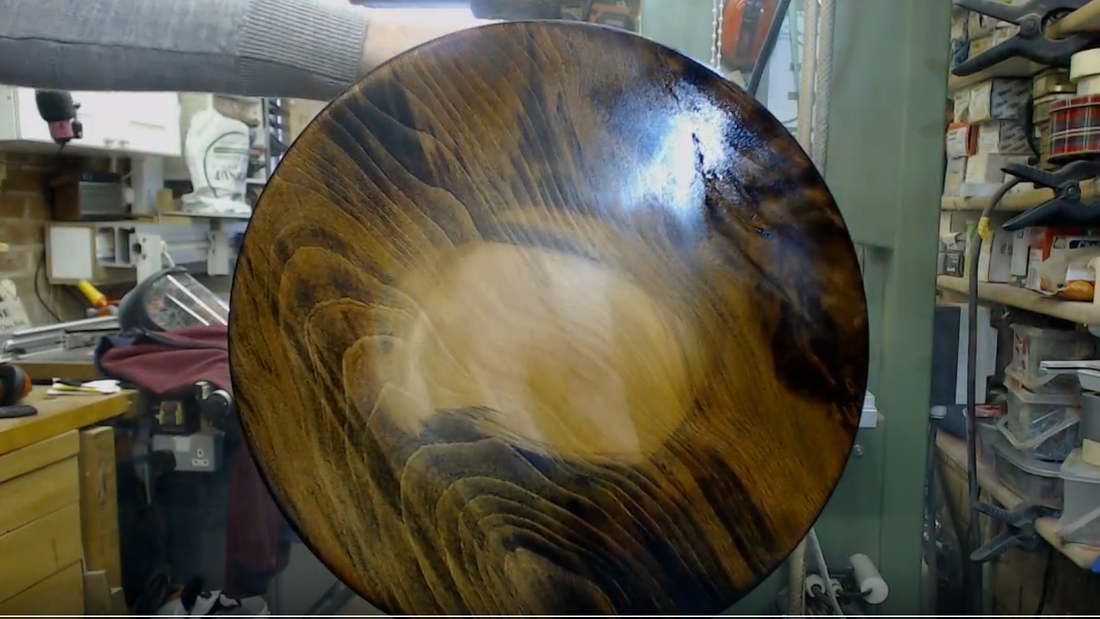
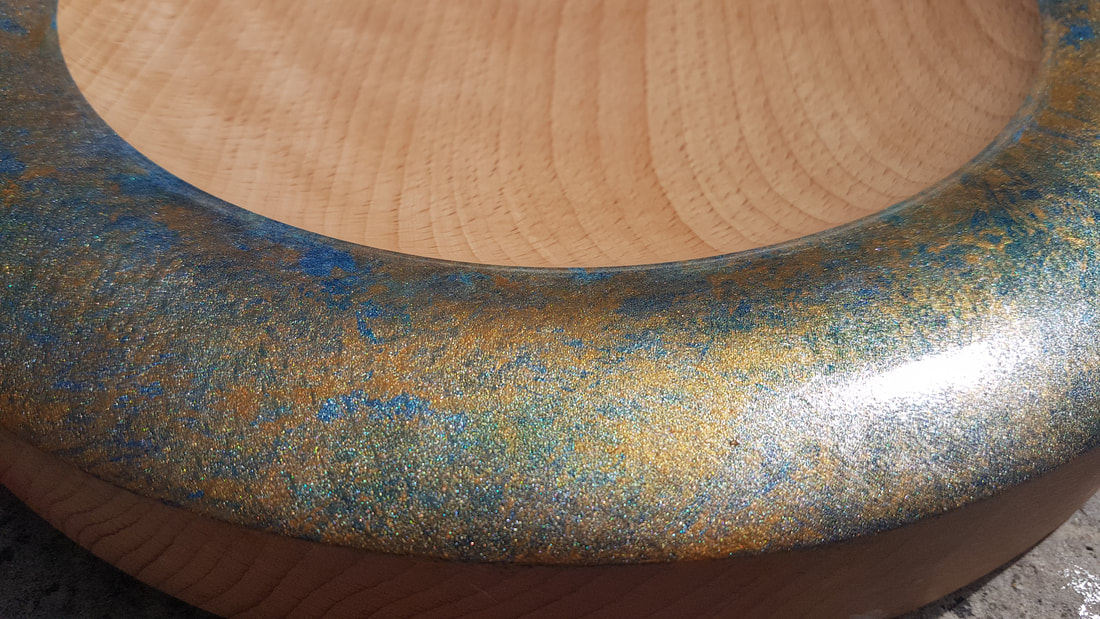
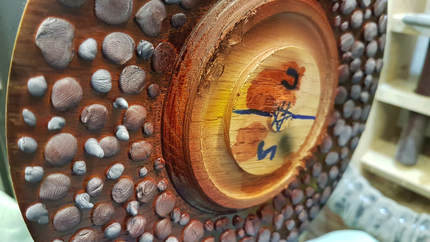
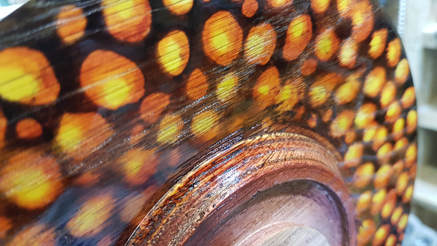
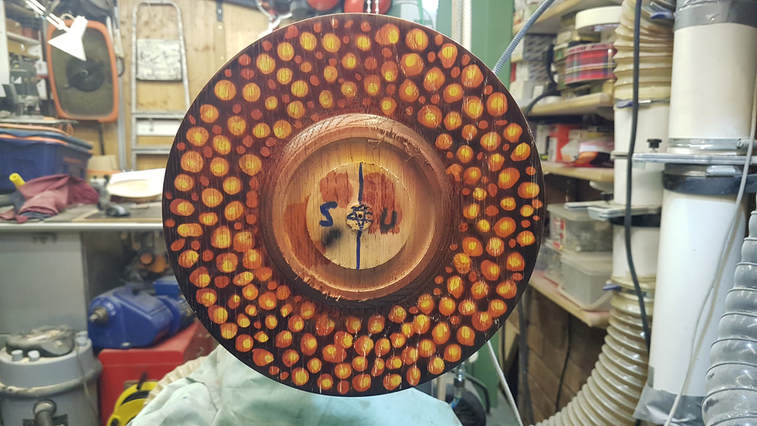
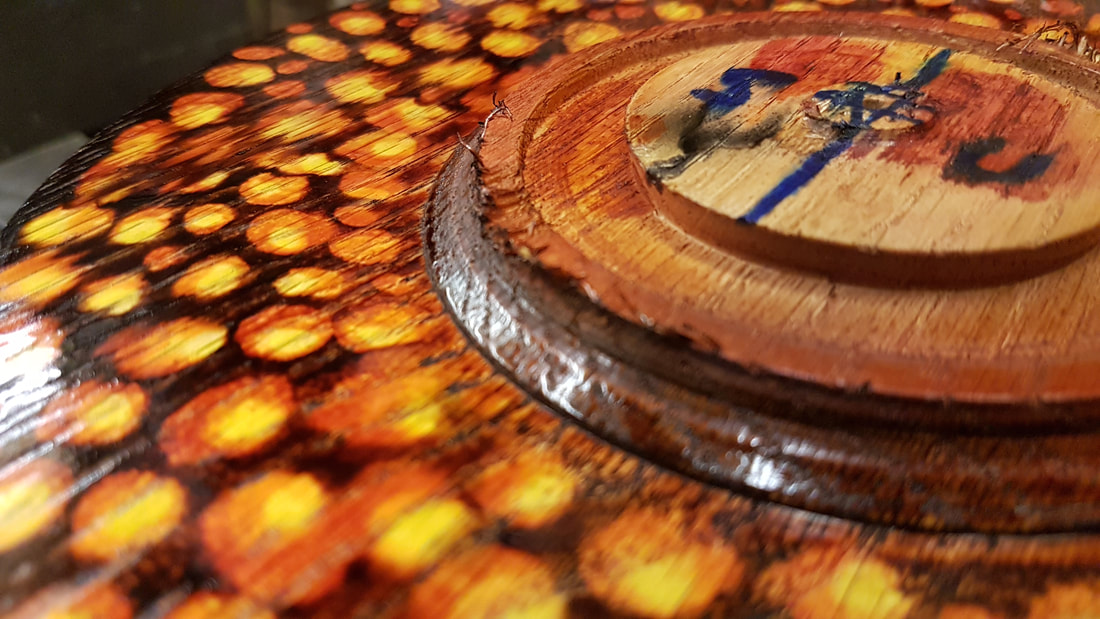
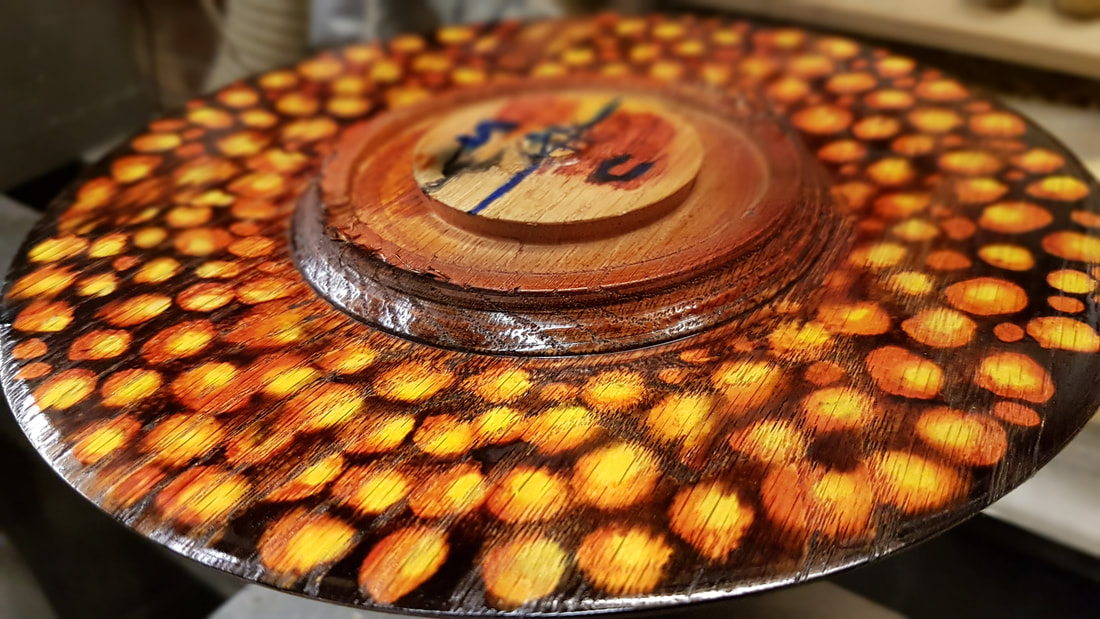
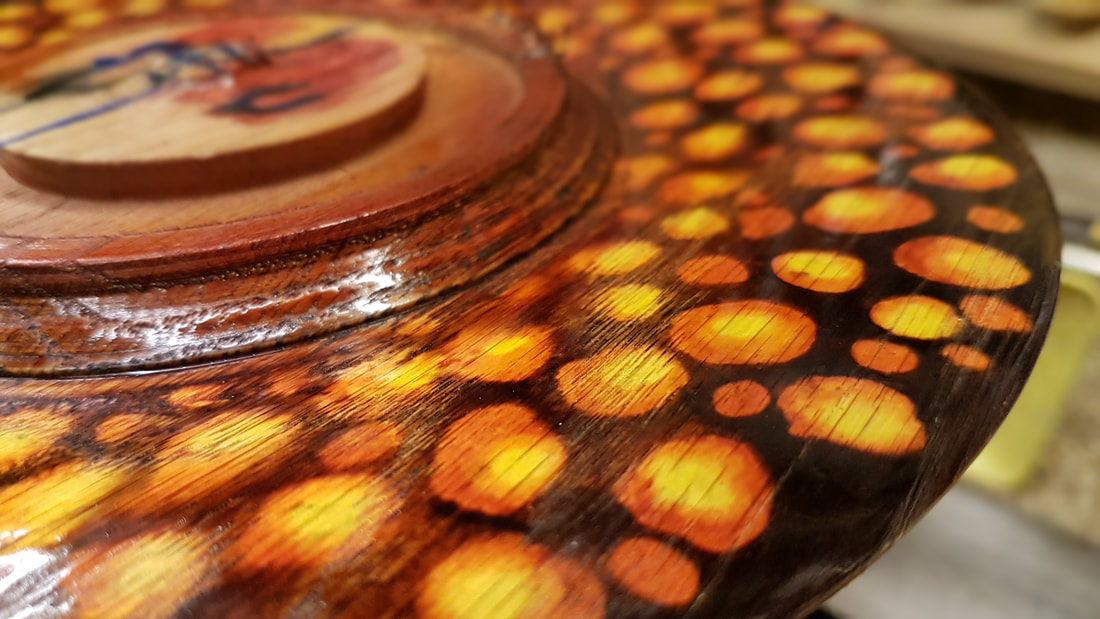
Sometimes, the idea in the head and the realisation of it in the wood doesn't quite come off....and this is certainly the case with this week's video... I'm not too keen on it; though I do like the individual elements, the overall look leaves me underwhelmed. However, the videos I make are almost all first efforts at something, so in keeping with this, I decided I would post this on YouTube anyway. I will be having another go but I hope it will come out much better than this one did. It says something if people prefer the back of it to the front!
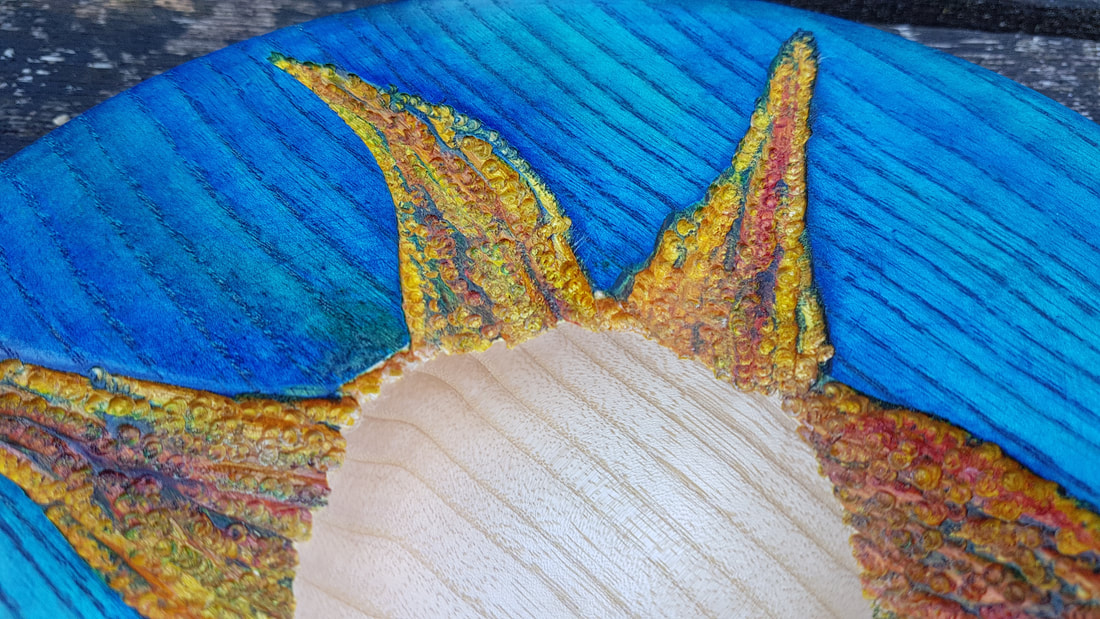
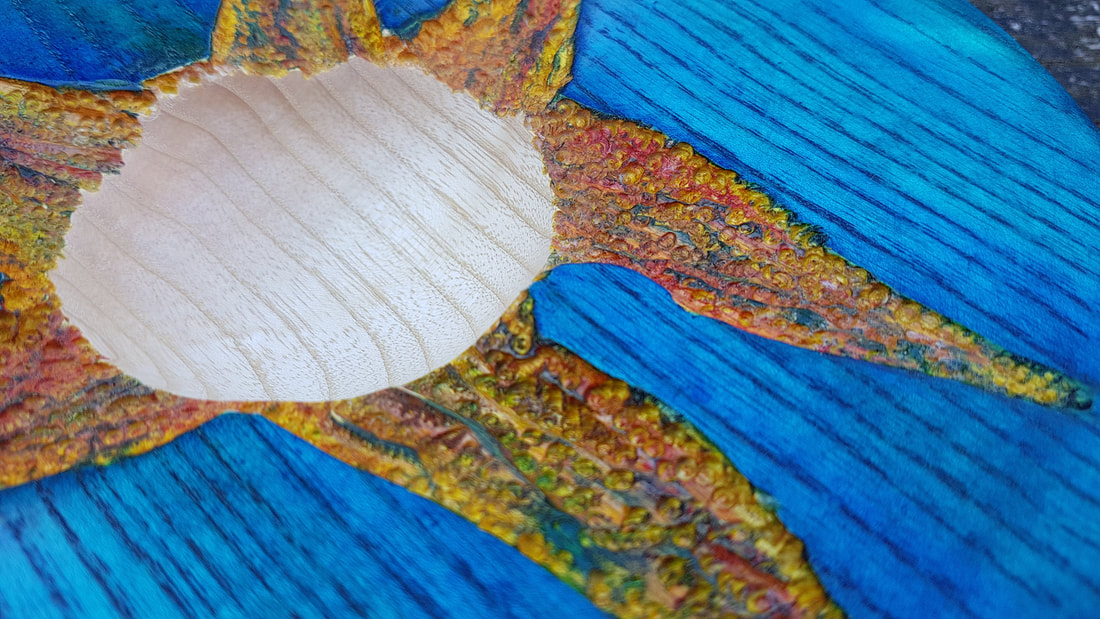
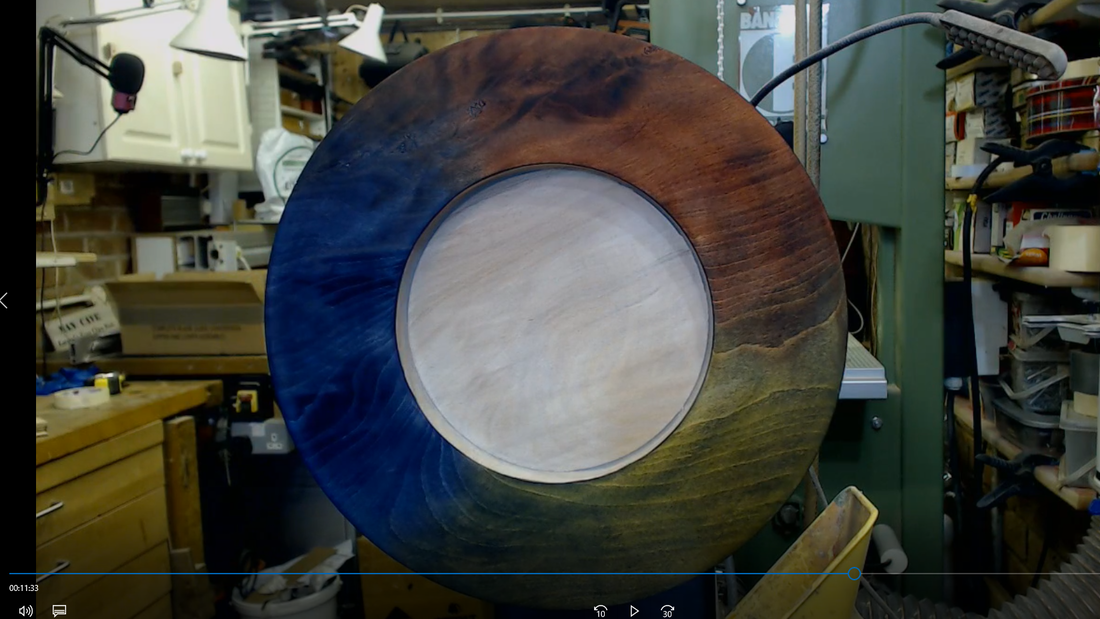
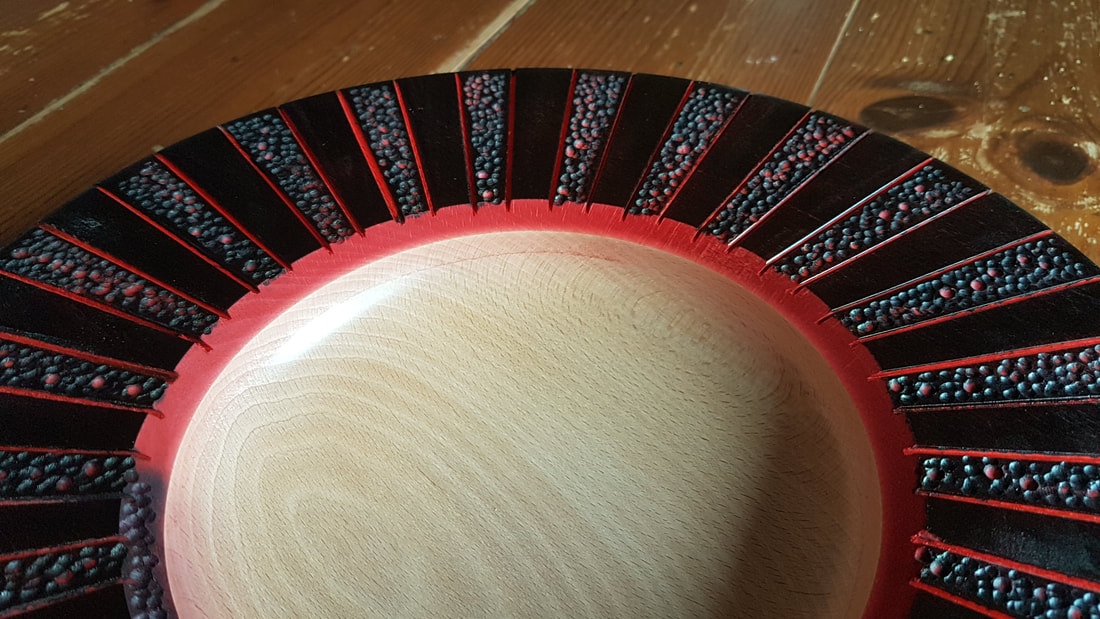
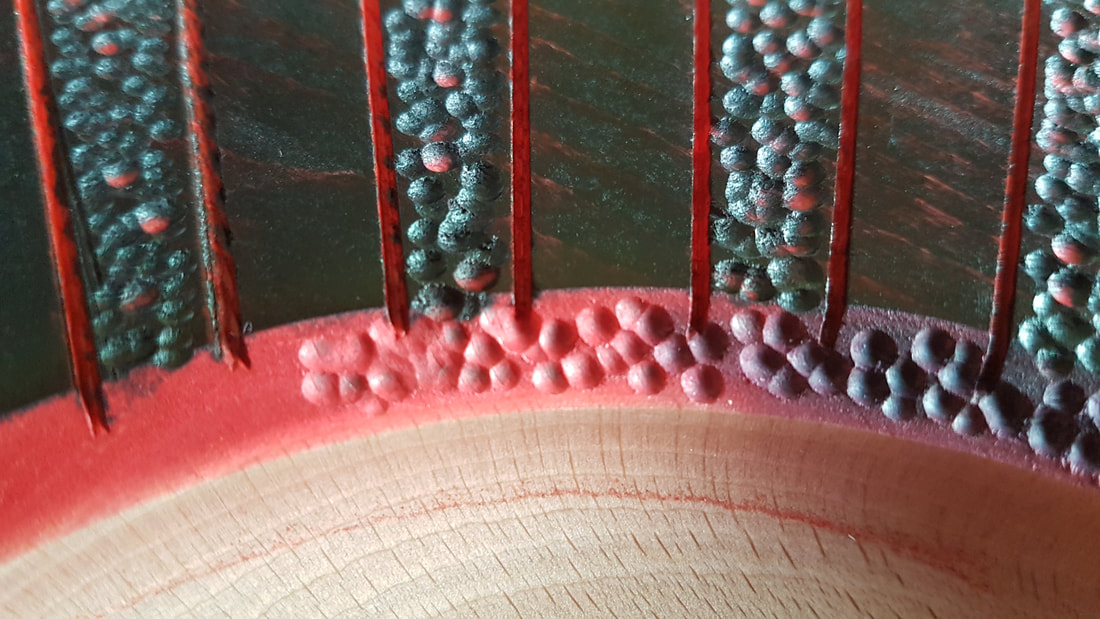
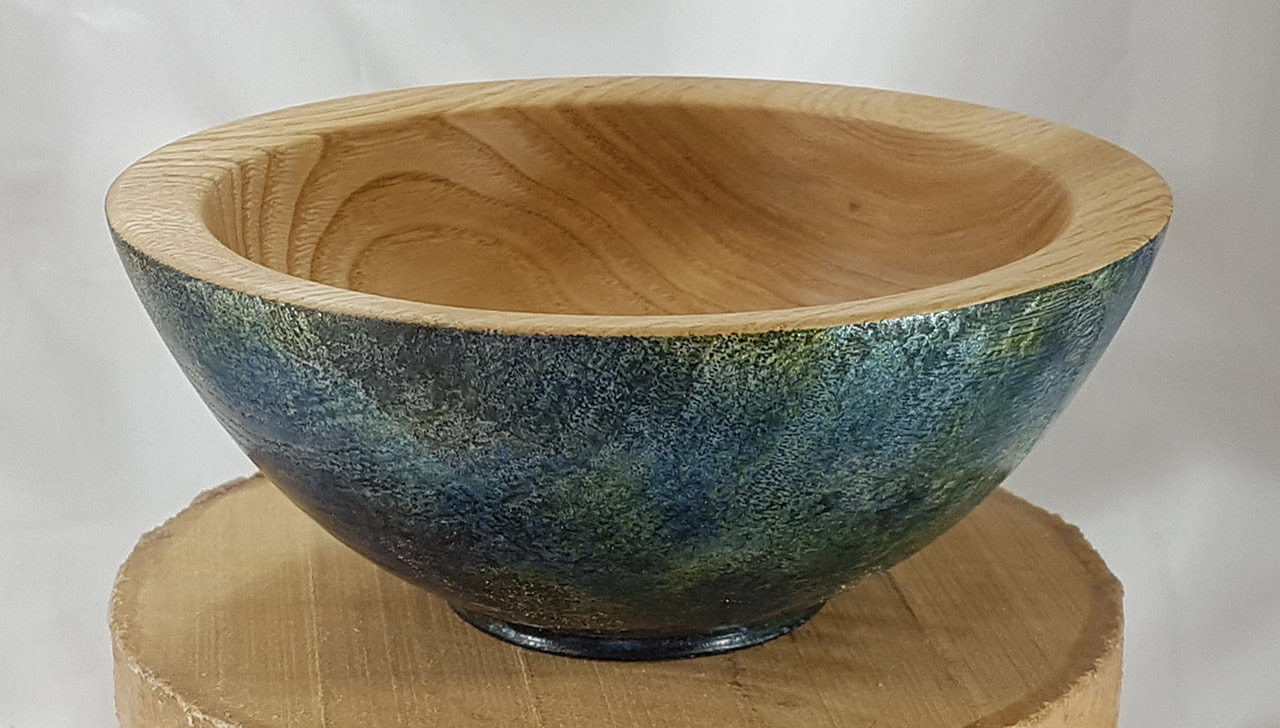
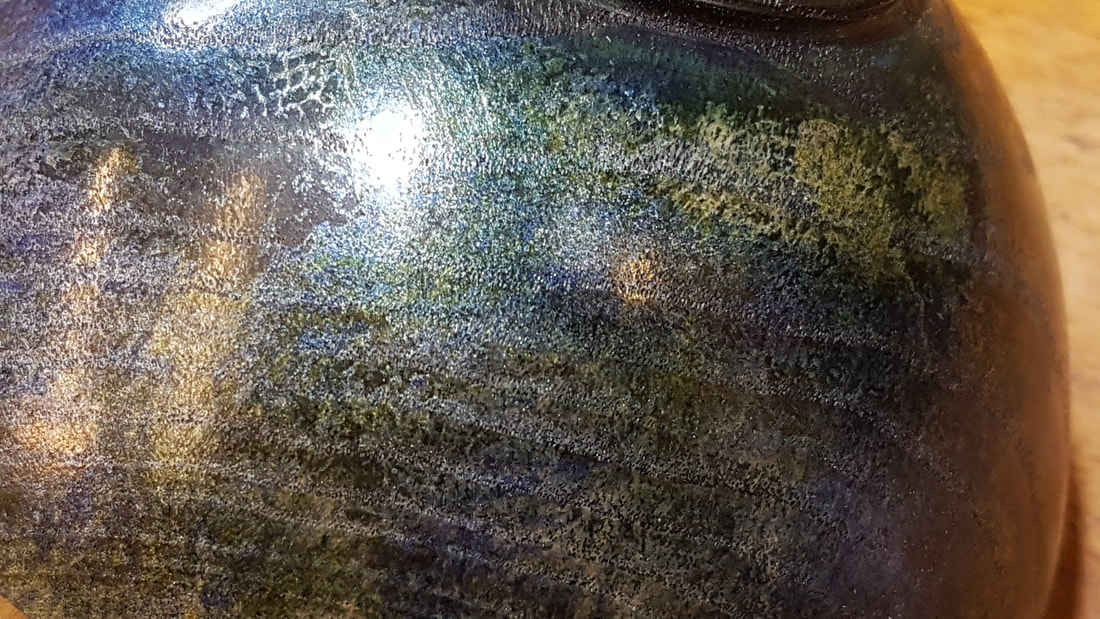
The blues are my favourite part. I do like the yellow textured section, but they don't work very well as a bowl - partly because the design is too messy and not well-executed. Partly because the edge of the bowl is broken up by the texturing. If I had thought about it a bit more, it might not have been a bowl at all, but I've not made any 'art' pieces purely for display....yet. This could be the direction to go with this technique, but I think I'd need to up my artistic skills to pull something like this off. Oddly, I did think it would have been better without any colour - but that was only a passing thought!
Still, it has had some encouraging comments and as I make the videos to share ideas and hopefully prompt others to have a go, my efforts weren't entirely wasted. It was also reassuring to see that it got a thumbs down from someone - most of my videos do get one thumb down...I'm beginning to wonder if it's the same person?? Well enough speculating about that - I need to get ready for a club demo night on Thursday next week and get some practice done in the shed ready for it. It won't be a mutant starfish fossil platter!
2 Comments
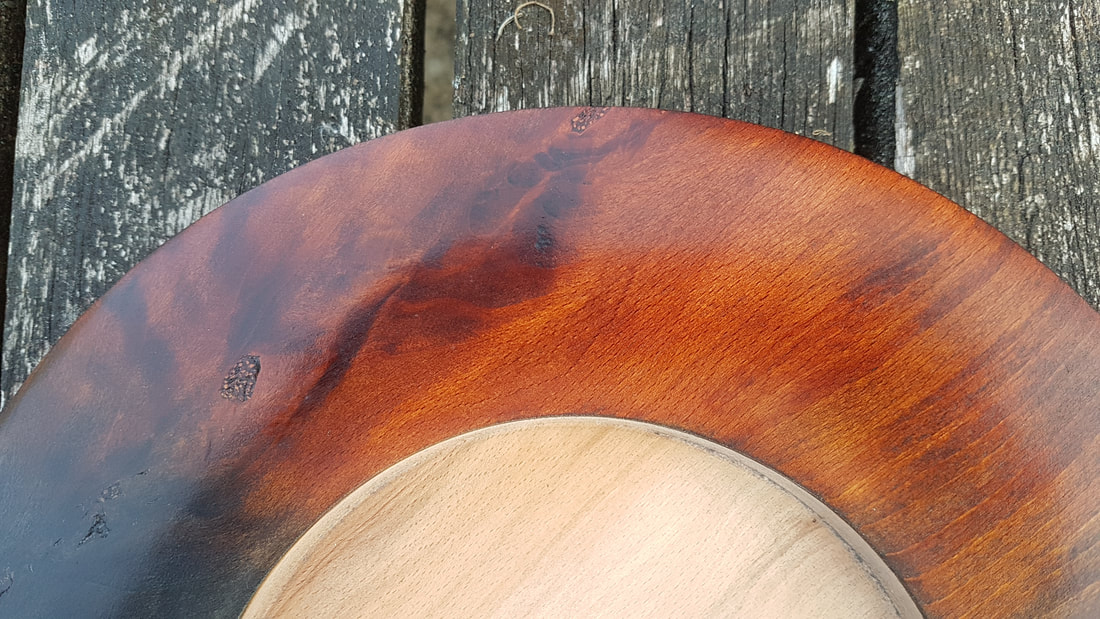
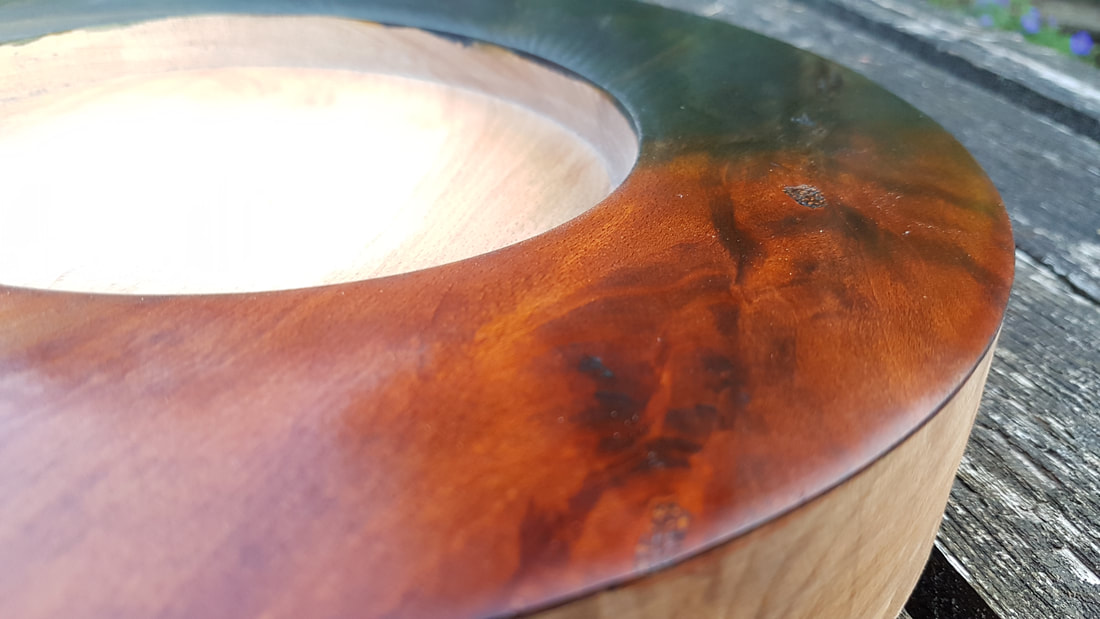
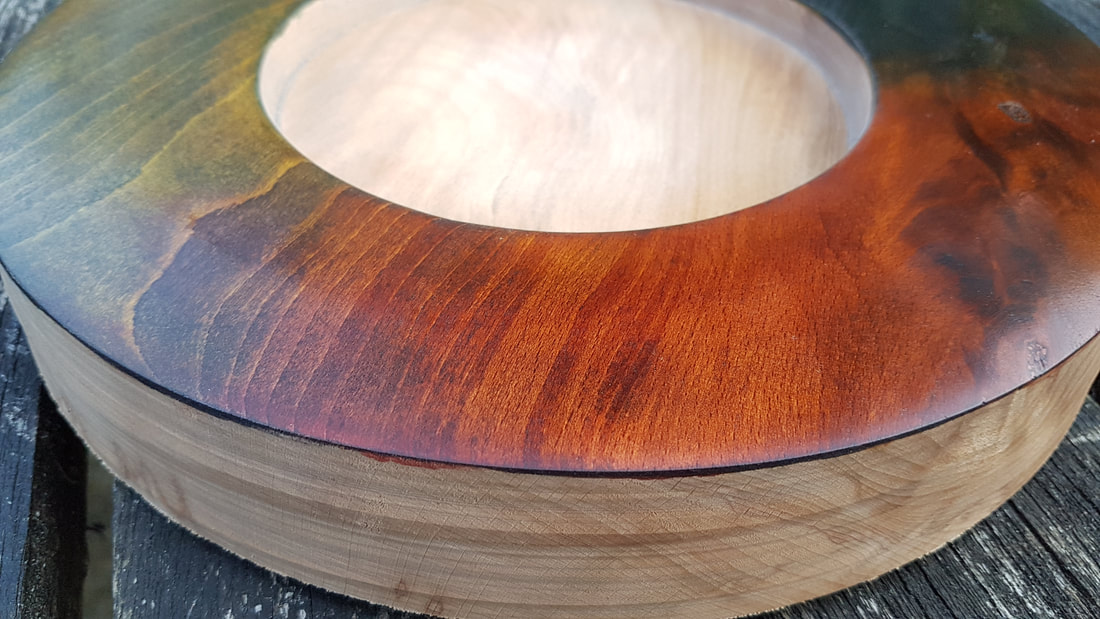
My last two videos have used the same colouring technique - working from darker stains to lighter ones, with sanding between coats. I hadn't intended to do the same technique twice, but after I had done it the first time with spirit stains from Chestnut Products, I was asked about using water-based stains - Intrinsic Colours from Martin Saban-Smith. So I made a second video using the Intrinsic Colours. I used the same blank for both media - with the result that there isn't a shot of the two platters to make any comparisons...so here are some shots of the spirit stain version alongside the water-based version. Both versions were finished with a coat of Chestnut Products' Acrylic Sanding Sealer and then three coats of Chestnut Products' Acrylic Gloss Lacquer. Spirit stains on the left, Intrinsic Colours on the right. Hope this is helpful.
Well, my head is certainly spinning this week. It was such a thrill to get this month's Woodturning magazine with some of my work featuring in it. I'd love to know what you thought of it if you have seen it...if you haven't, it's in the shops now! 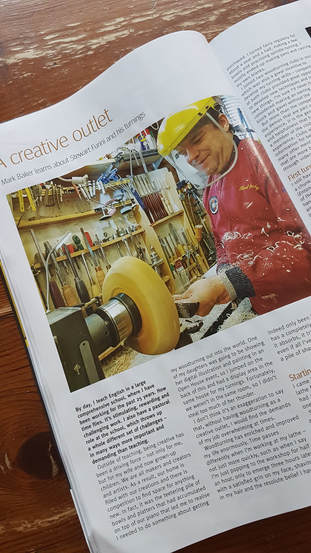 I hope there'll be an opportunity to do some more writing, and share ideas about colouring and texturing wood, though I also do 'normal' turning as well.
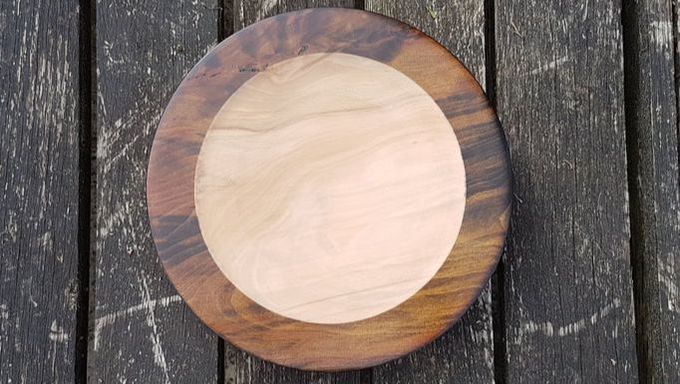
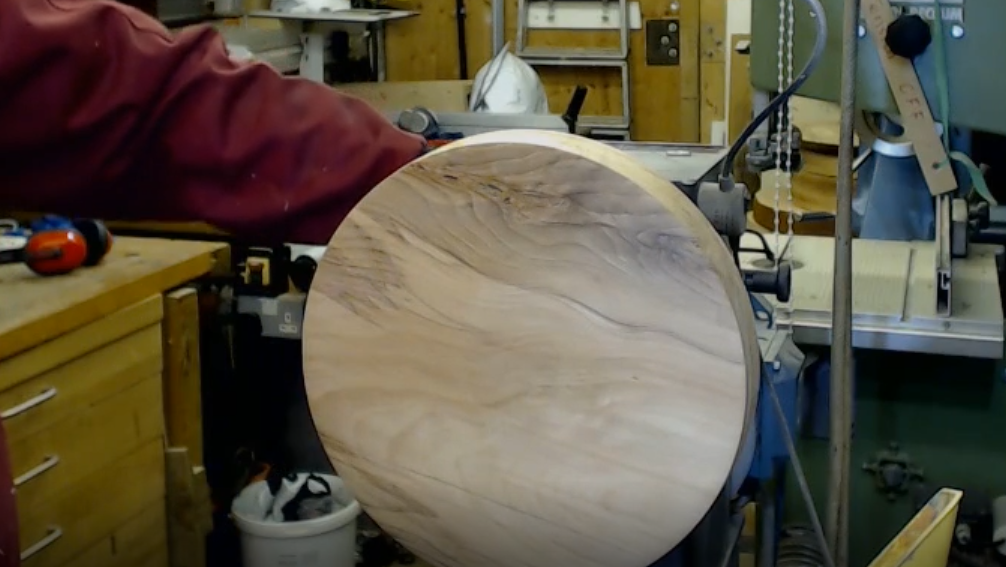
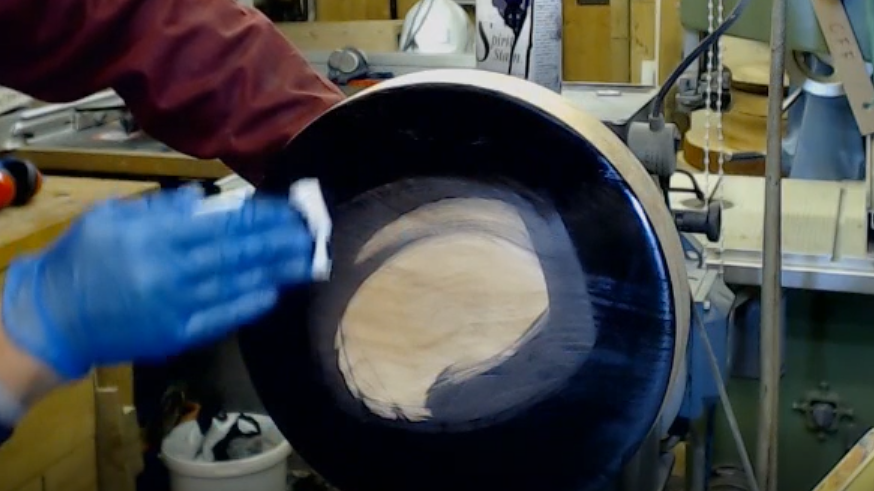
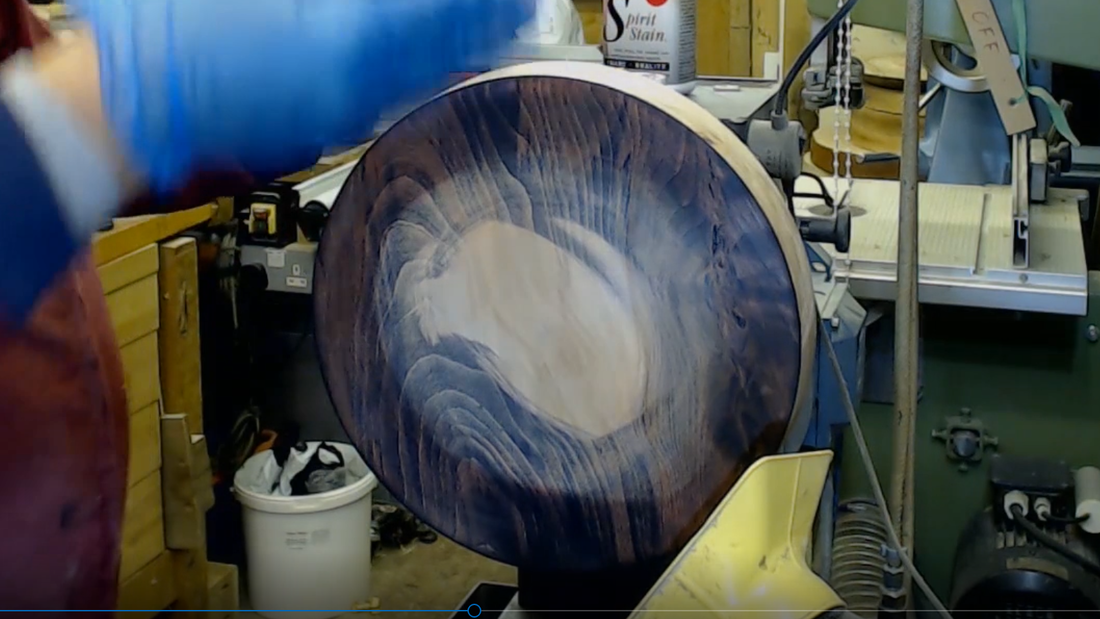
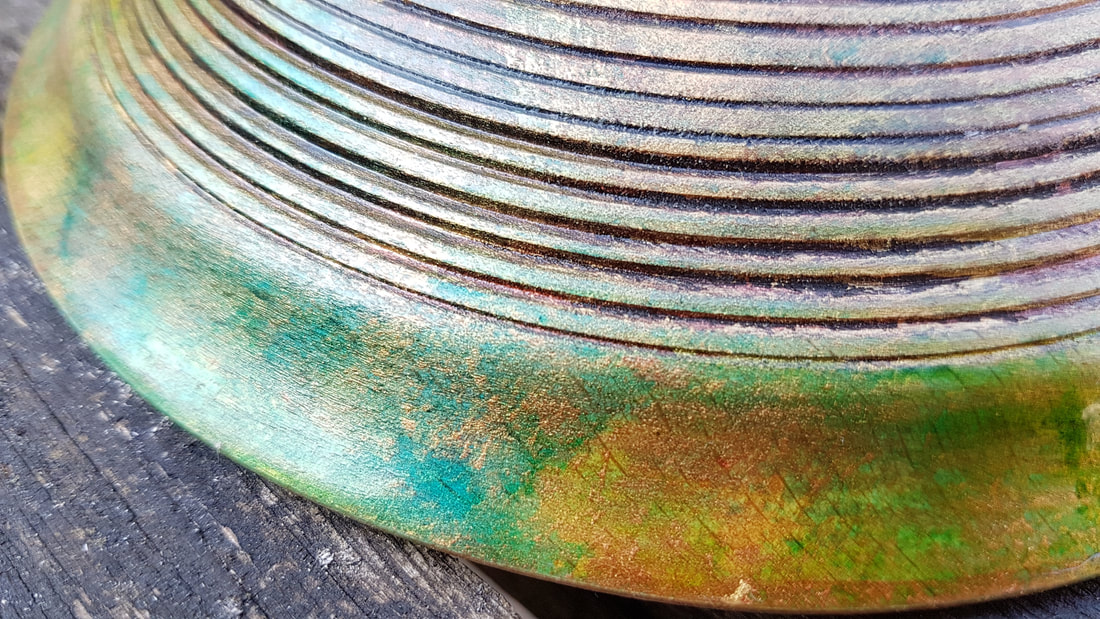
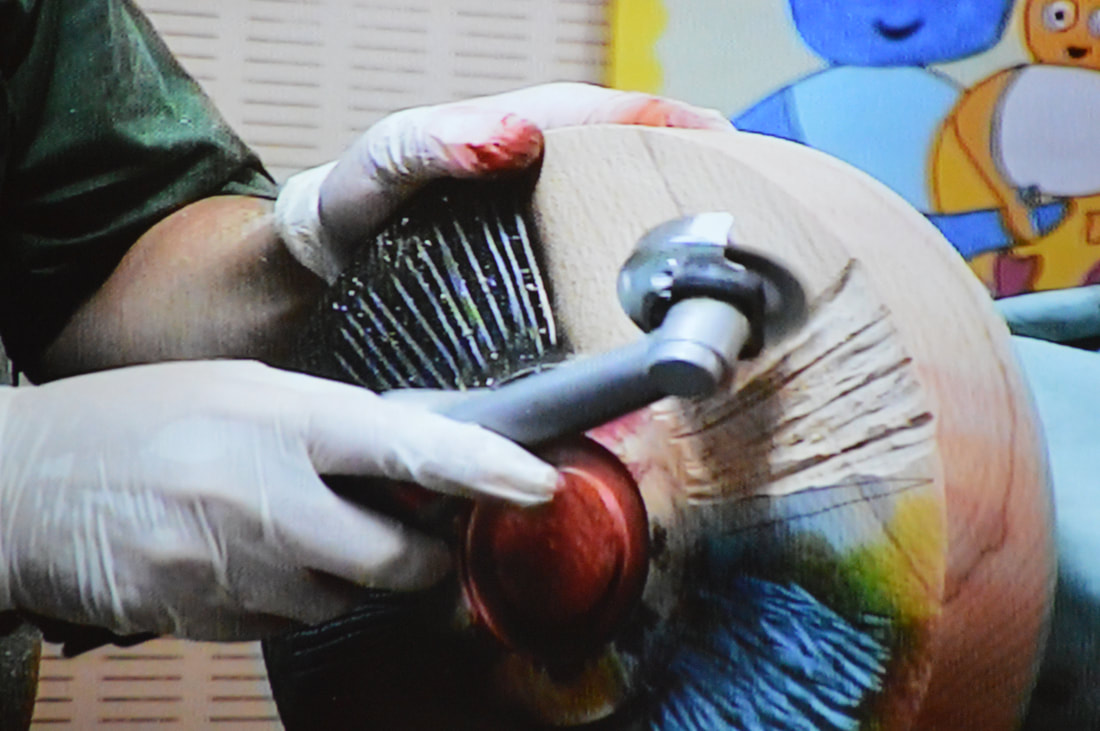
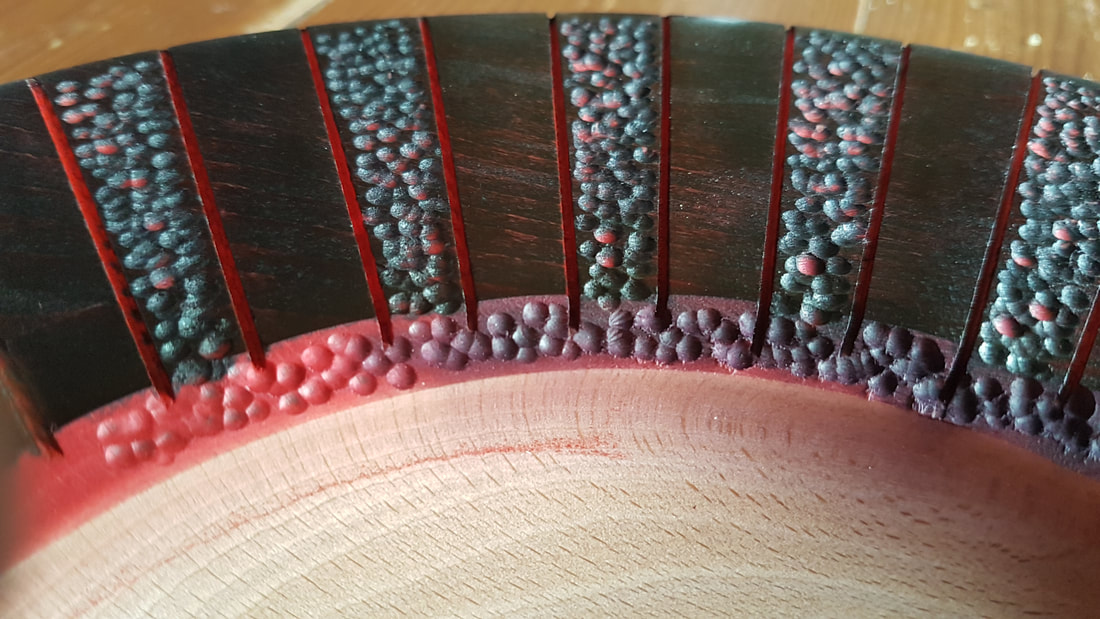
My next club competitions are coming up, so expect to see some videos soon that aren't about platter rims! One competition piece has to contain part of a natural edge, the other is a three-cornered bowl. It was great this week to watch John Plater demonstrate some variations on three-cornered bowls which has got me thinking about my design. No doubt there'll have to be some practice pieces as I've not done a three-cornered one before. I'm giving serious thought to doing some piercing and colouring to it as well... I've finished off the latest video and it was posted on YouTube earlier this evening - it's the same technique as the previous video, but with Intrinsic Colours instead. The video can be seen here. I had been hoping to get down to Yandles yesterday for their September show, but it didn't work out. I'll have to wait for next April. However, there is the AWGB seminar coming up - I'm hopeful of getting to the Saturday sessions. I haven't been to one before, so I'm looking forward to it. It starts on Friday 5th October and ends on Sunday 7th October. It's been good to get back in the shed this week after my summer break in Italy and Austria. My latest video is up on YouTube and I've been filming again today for a follow-up video which I hope will be finished in a few days' time. Sometimes, I intend to colour a piece of wood only to find that the grain is lovely and that colouring with an opaque finish would really not be the kind thing to do to the piece of wood. I do have some sensibility left for appreciating wood in its natural beauty. This is what my latest video covers - adding colour to wood but allowing the grain to show through. Of course, a wash of colour or stain could be applied, but that would only change the colour of the rim. This approach, I believe, enhances the grain and figure of the wood by increasing the contrast. The process is simple - prepare your piece of wood by sanding the surface to 320 grit. Then cover with black stain. In the video I use Chestnut Spirit Stains. I'm working on the follow-up video by using Hampshire Sheen's Intrinsic Colours. Sand back the black stain to leave about 30% of it. If you want it darker, repeat the process with black stain. Then apply a second colour. I used red. Sand this back and finally add a third colour. In my case, I used yellow. The principle is that the colours used get lighter. This really brings the grain to life. Hopefully, the pictures show this. You can, of course, use different colours and get a completely different effect. I think this is the closest finish I've done to something that looks naturally like wood.
The build up of the layers of stain helps to seal the wood and allows the later layers to build up in shine and brightness. The first layer of black soaks into the more porous parts of the grain where it remains after a light sanding to remove the majority of the black. I have tried this on less figured grain, but the effect is not very pleasing. I think it works much better on wood where there is some swirl and movement in the grain. I hope the pictures show how the technique brings out a stronger contrast in the grain. When I posted the video of this process on YouTube, I was asked why I had used spirit stains rather than water-based stains. The reason is that I have always done colouring with spirit stains since I saw a demo by Terry Smart from Chestnut Products over 5 years ago. After posting colouring videos on the internet over a few months, Terry was kind enough to supply me with some more spirit stains and lacquers. I like using them for their ease of application and the vividness of the colours. However, there is nothing to stop you using whatever stains you want. Martin Saban-Smith sent me a sample set of Intrinsic Colours to try, and I'm using them with this technique for my next video. So keep an eye on my YouTube channel if you want to see the difference. I think I'll also try this with acrylic paints mixed with a transparent medium. I sense a common colouring theme emerging! I'll finish this section with screenshot from the video footage of the rim coloured with the Intrinsic Colours. This hasn't had any finish added yet. I also tried three different colour combinations to get more experience with using the colours.
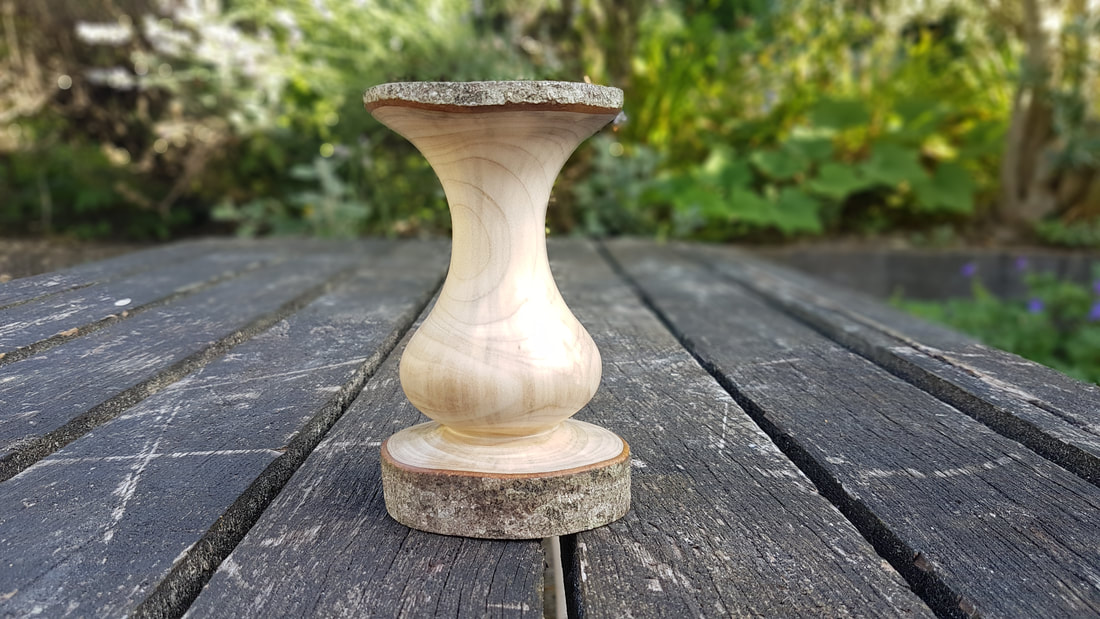
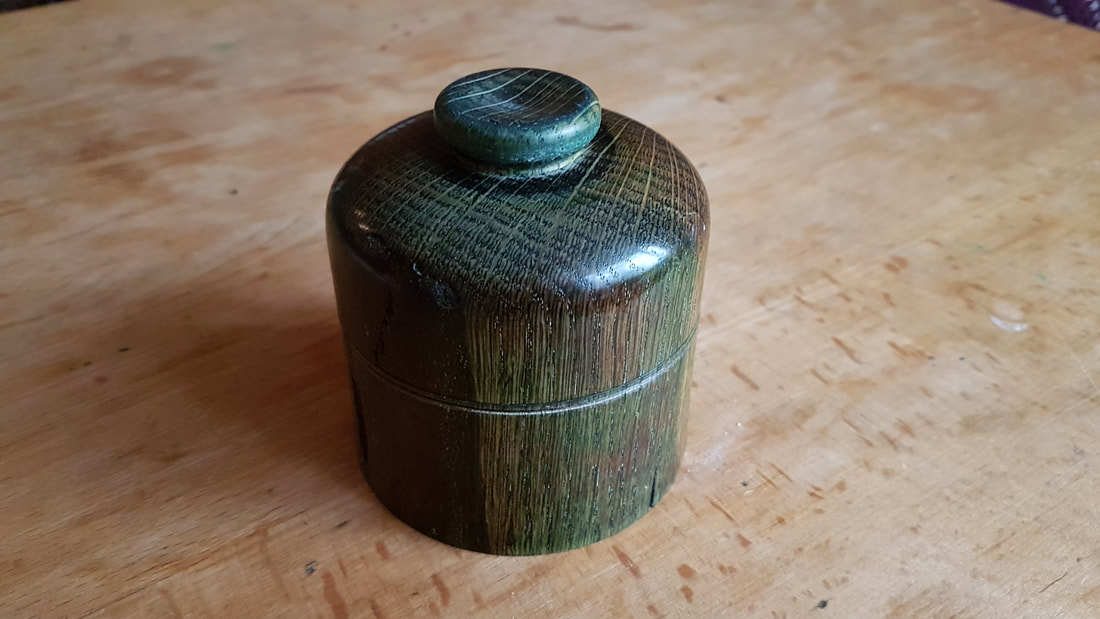
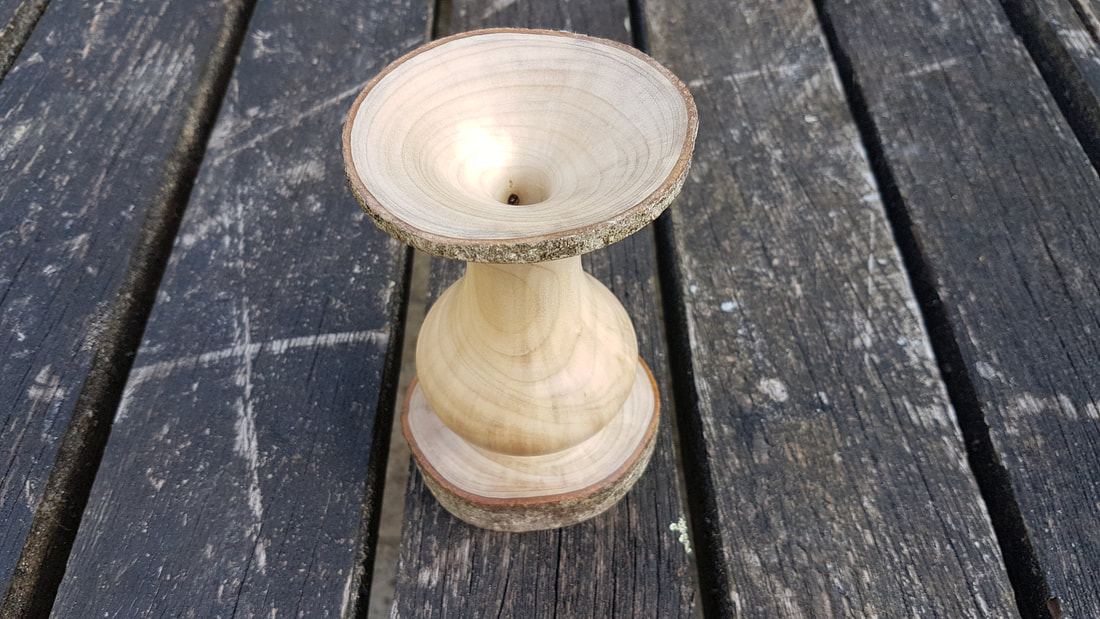
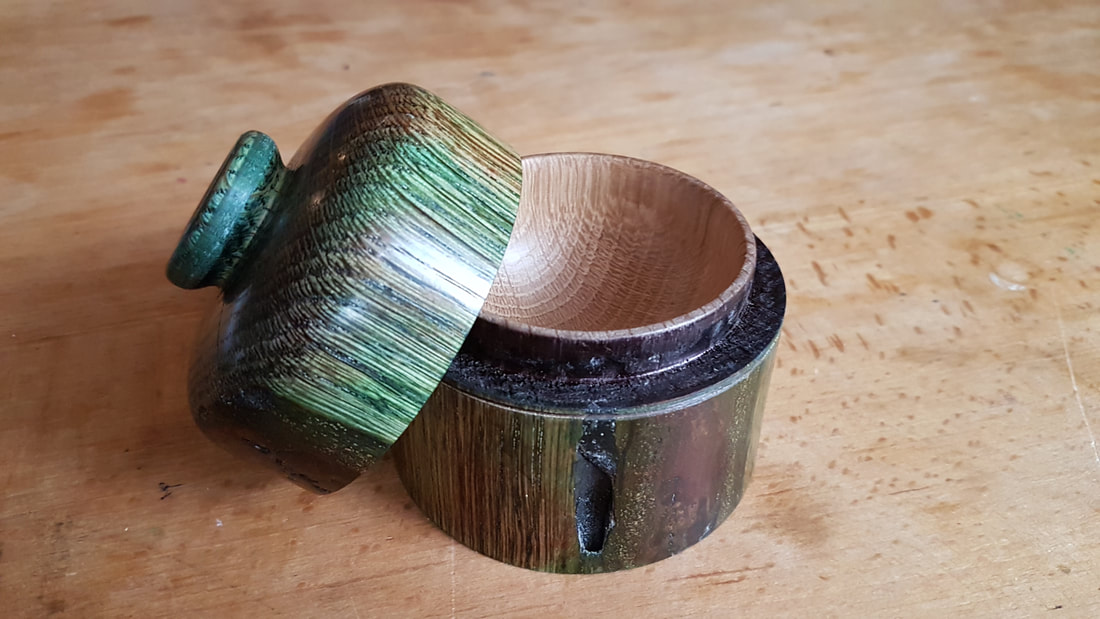
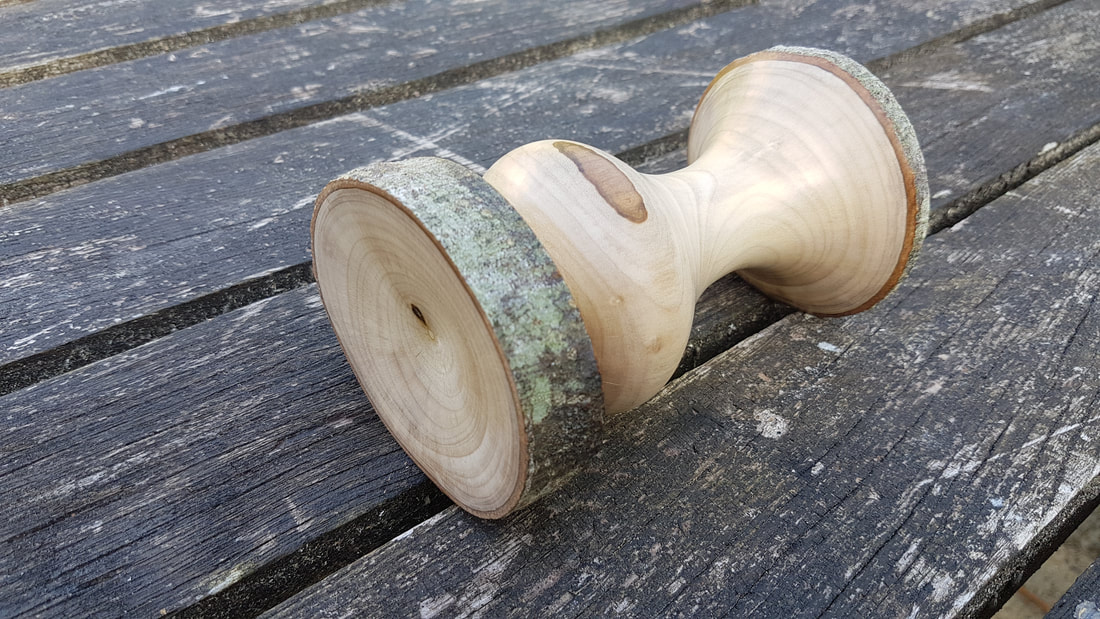
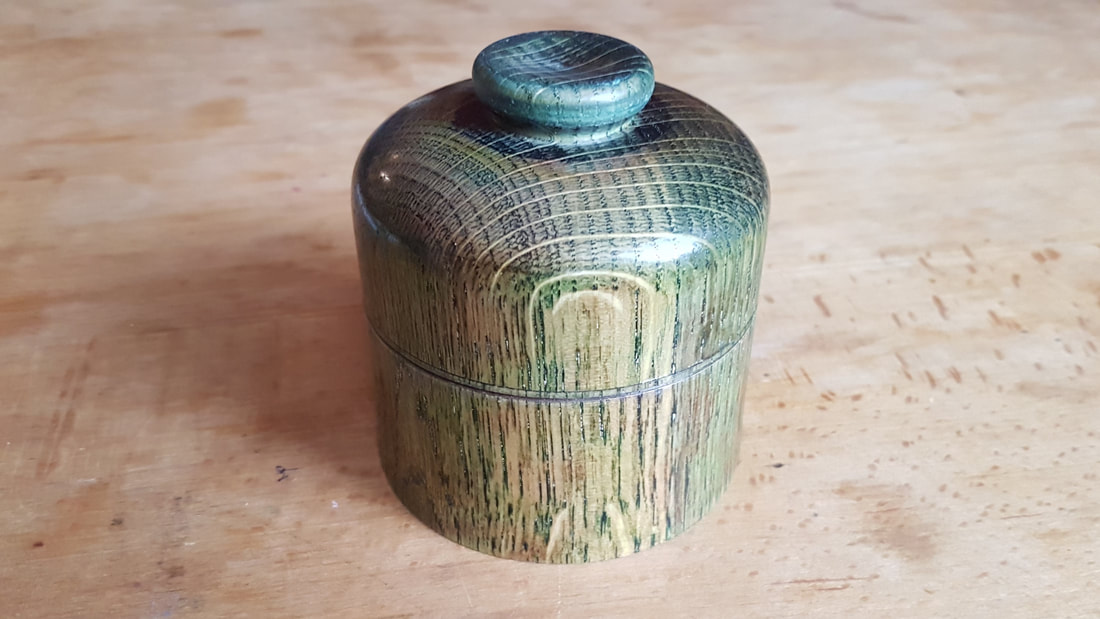
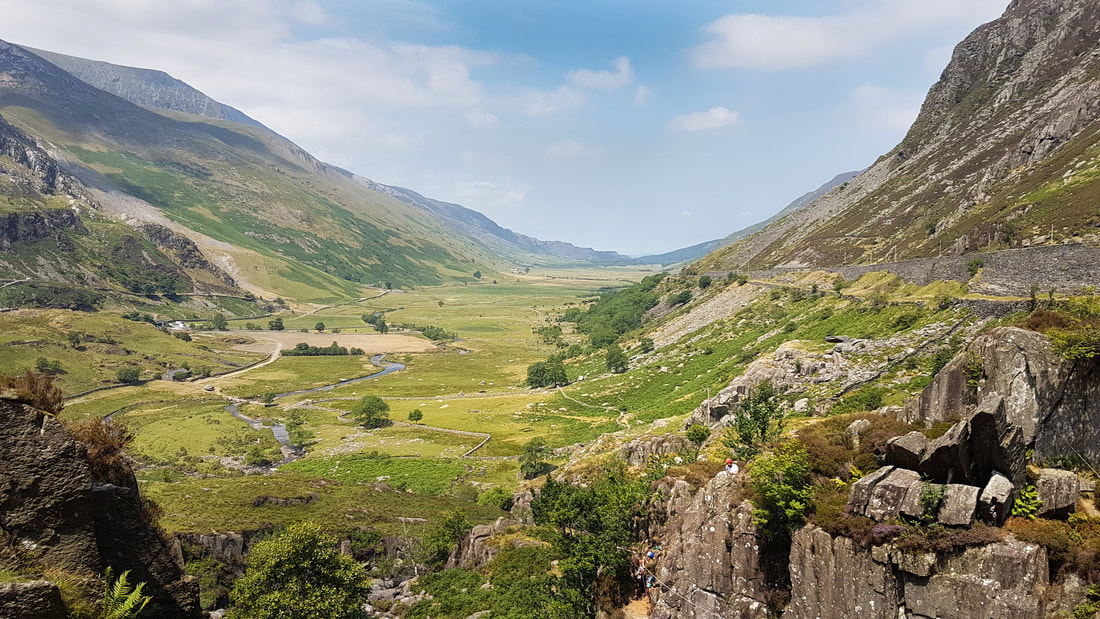
Well, the long school summer holiday is getting close to its final week - it's GCSE results today, and I'll be heading off to school later this morning to see how my students did. Fingers crossed! It seems a bit premature to be thinking about next year's summer holiday before this one has even finished, but I'm excited to be one of the demonstrators at Chestnut Products' first ever Woodturning Weekender event. This is to celebrate being in business for over 25 years. Details are still being released about all the demonstrators, but you can find out all about the event here. So far, apart from yours truly, Emma Cook, aka the Tiny Turner, is also demonstrating. I saw her demonstrate at UKIWS so I know how excellent she will be. It's on the first weekend of August 2019. I often imagine I'll get days of shed time over the summer holiday and spend hours trying out new ideas and techniques. The reality is often different though.....I seem to forget about the 'holiday' part meaning I'll be away from home for a large part of the time. This year, I was able to spend a couple of weeks in Italy and Austria walking up, down and across mountains. The landscape was spectacular and has started the thought processes going for new colouring and texturing ideas. Watch this space.... 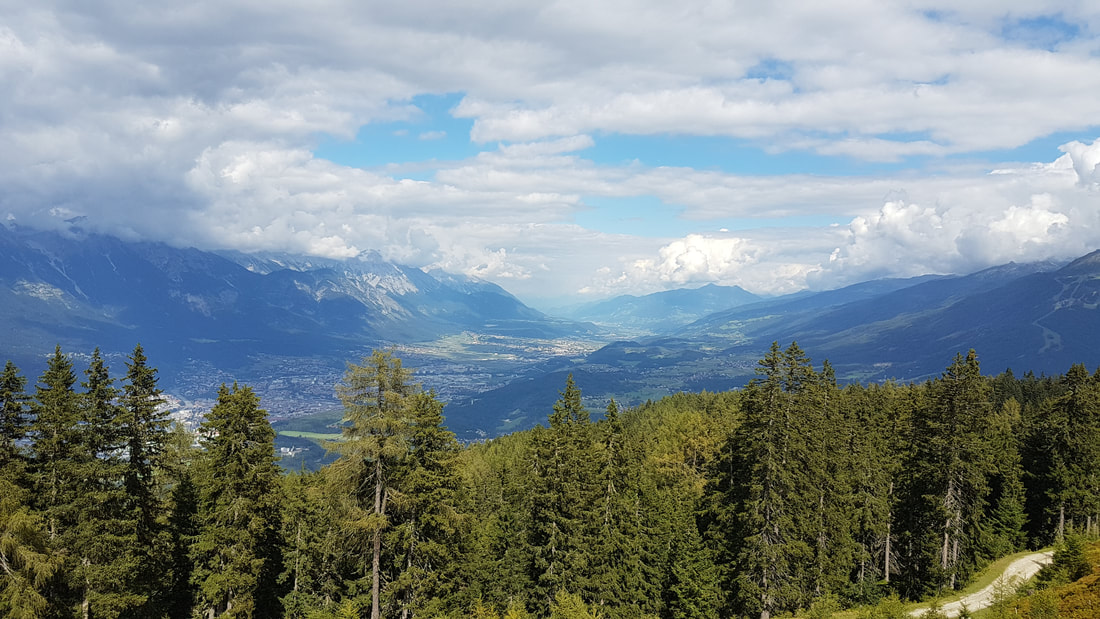 Innsbruck...how can this view be anything other than inspiring? I spent the start of the school break clearing up my workshop and getting better organised. Hopefully this will make shed time more enjoyable when the school term starts again and turning time becomes precious. Very little turning has been done recently. I've managed a small bud vase and an oak box so far. Not a lot of output for a month! I'm also thinking about my next demo, in September at Cheam Woodturners. It will, of course, focus on colouring and texturing - surprise, surprise. If you can come along, it will be great to see you. There'll also be some more exciting news, for me at least, next month, so watch this space!
 My first cover shot! My first cover shot! I guess the art of blogging is something I need more work on - four months have passed since my last blog post. And do I have any defence for being so neglectful?? Well, not really, considering it doesn't take that long to type something up! So what has been happening... The highlight of the last few months has to have been UKIWS 2018. I was immensely flattered to be asked to demonstrate (quite a daunting prospect for my fourth public demo!) And I was even more flattered when I saw that one of my platters had made it onto the cover of the printed programme. Thank you so much, Martin. As well as having fun doing the demo, it was great to meet people I have only had contact with in cyberspace. Real life is much better. A big thank you to Barry Cook for a large Afromosia blank that will feature in a video sometime soon. I have to admit to having some nerves before starting the demo off, which lessened as it went on - but I did manage to muck up the timing completely and stopped half an hour before I was scheduled....shame, as I still had two more blanks to demonstrate a couple of different techniques on... UKIWS 2019 is already provisionally set for Saturday 20th and Sunday 21st July 2019. I can't wait! We've also had Makers Central since my last blog. I was able to get along for the Saturday. It was great fun - lots to see and lots of people to meet. I managed to limit my spending, somehow! There were many highlights, but I especially enjoyed seeing Mick Hanbury demonstrate colouring with Jo Sonja paints....and, yes, I did buy some... It was also great to meet up with Terry Smart from Chestnut Products. I've been a fan of their products since I first saw Terry do a demonstration at South Downs Woodturners in 2013. Terry has kindly offered to support me with supplies to help me with the colouring and texturing videos I've been making since 2017. Thank you for your generous support, Terry! I've also done two club demonstrations - one at Birstall Woodturners in April, and one at Berkshire Woodturners Association in July. These were great fun to do, even if the Birstall one involved a lot of travelling up to Yorkshire from Sussex.
And of course, there have been the videos....and the subscriber count has been continuing to rise.....now just over 2000! So there'll be another giveaway coming up soon, though the summer holidays will delay this a while. This year, we are off to Italy and Austria - an opera in Verona, some swimming in Lake Garda, and then off to the Alps in Bolzano and Innsbruck. I'm hoping there'll be some inspiration for platter decorating - a recent trip to Snowdonia gave me some ideas which I've had a bit of play around with, but I should have mixed up the right colours before I started. I also need to work on making the texture a bit finer. I'll try to be a bit more regular after the summer break!
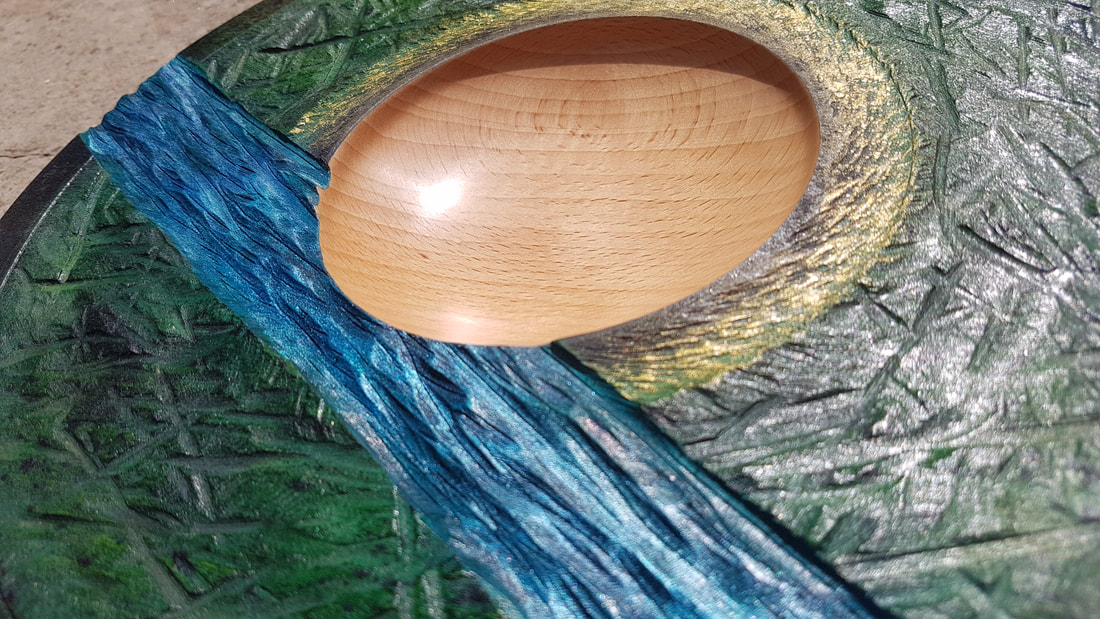
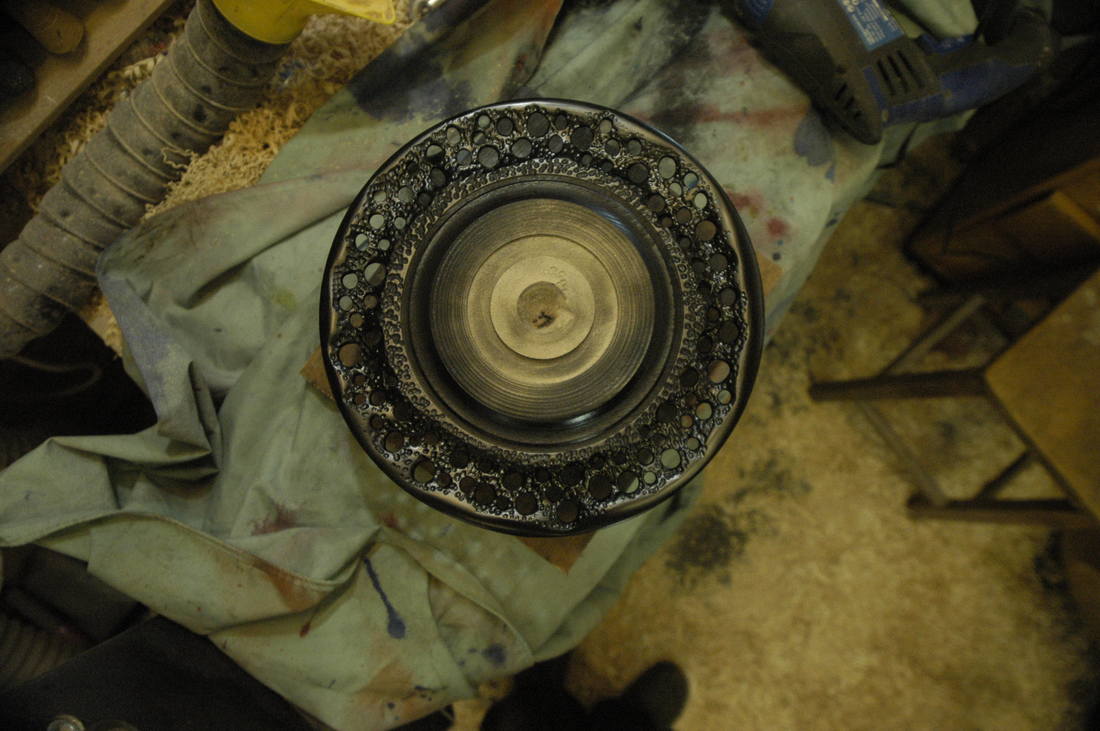
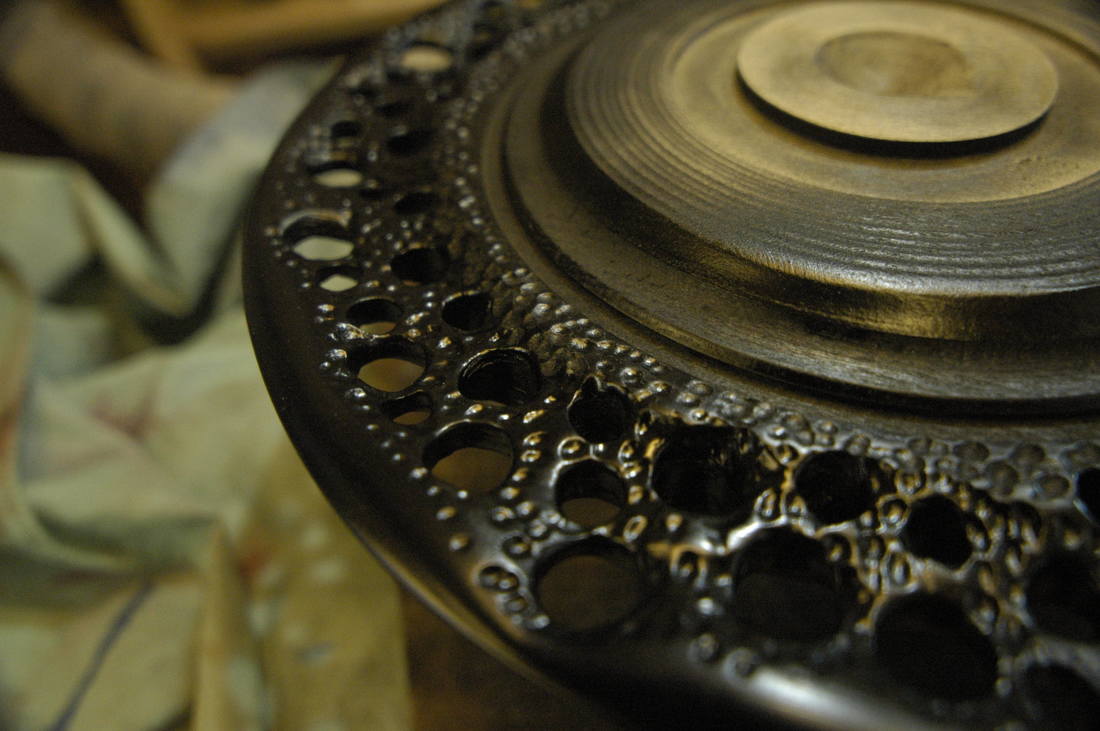
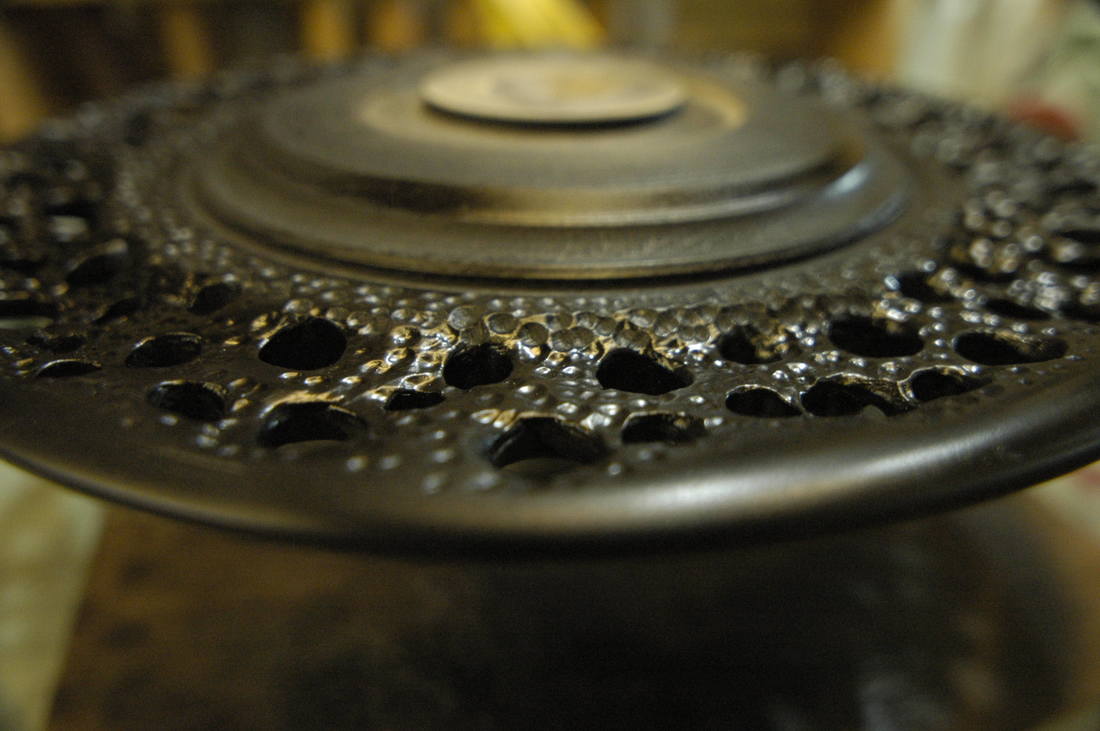
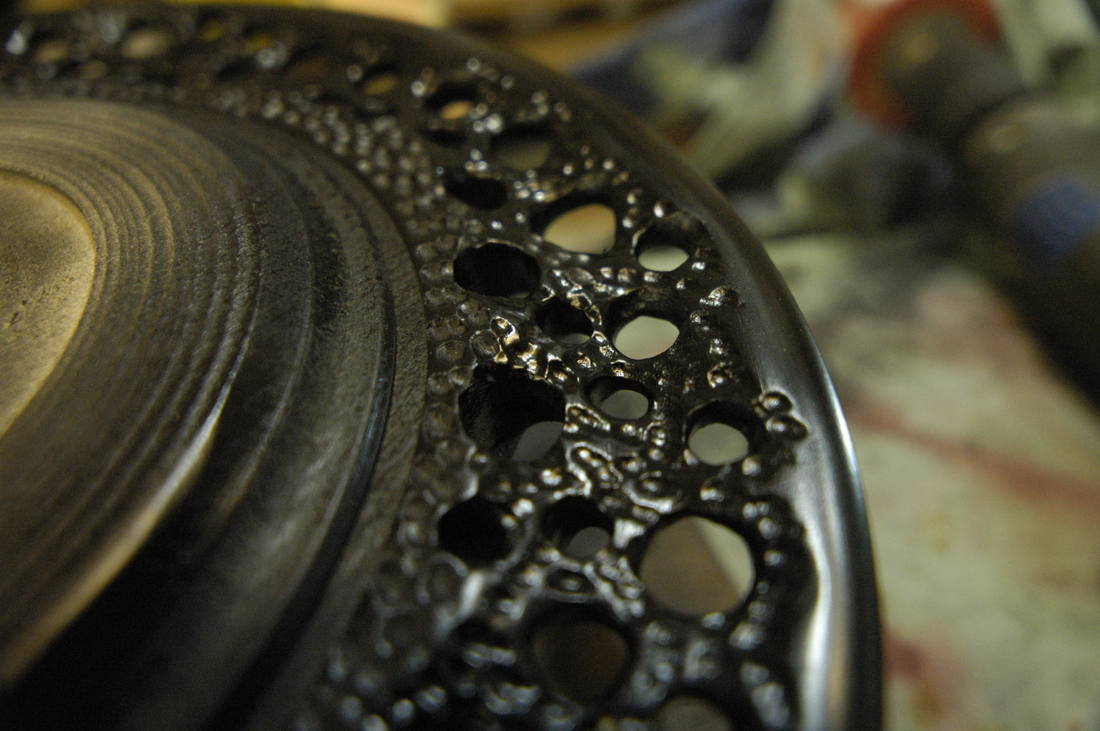
Maybe you've come here from the Youtube video on making this platter. If so, thanks for clicking through! As I said in the video, I wasn't very pleased with the transition from the inner rim to the bowl - the uneven depth of the cuts was one reason; the change from coloured to plain wood was also a bit of bugbear. 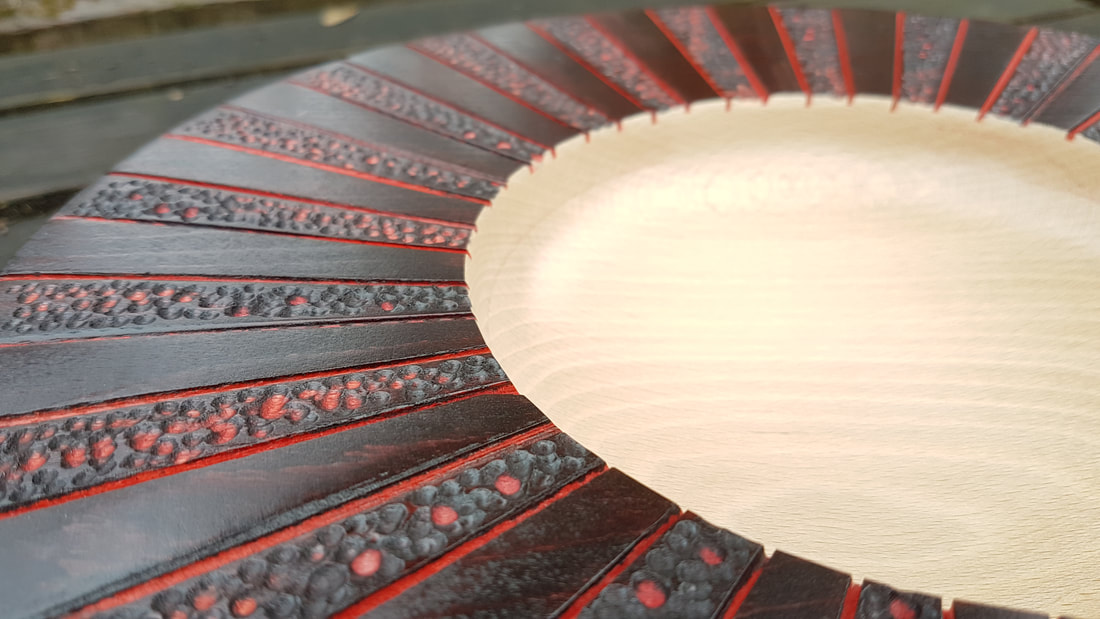 UGLY rim transition - uneven depths and jagged transition from coloured to plain wood... So...it was time to try out a few ideas. This is why I like to leave the turning recess on my platter bottoms, so that I can easily put them back on the lathe and change things! An angled inner edge was put on the rim which helped to soften the transition, but it still wasn't right. So out came the rotary tool and ball cutter again. Then stains....I think the red looks best as it gives a lift to the whole platter, but the black helps to disguise the uneven depths of the red slots. I've left the platter to consider the final idea - at the moment, I'm considering texturing just along the outer edge of the inner rim which will be coloured black, then blending into a smooth area which will be bright red to add some lift to the effect. When I'll get this done is a different story!
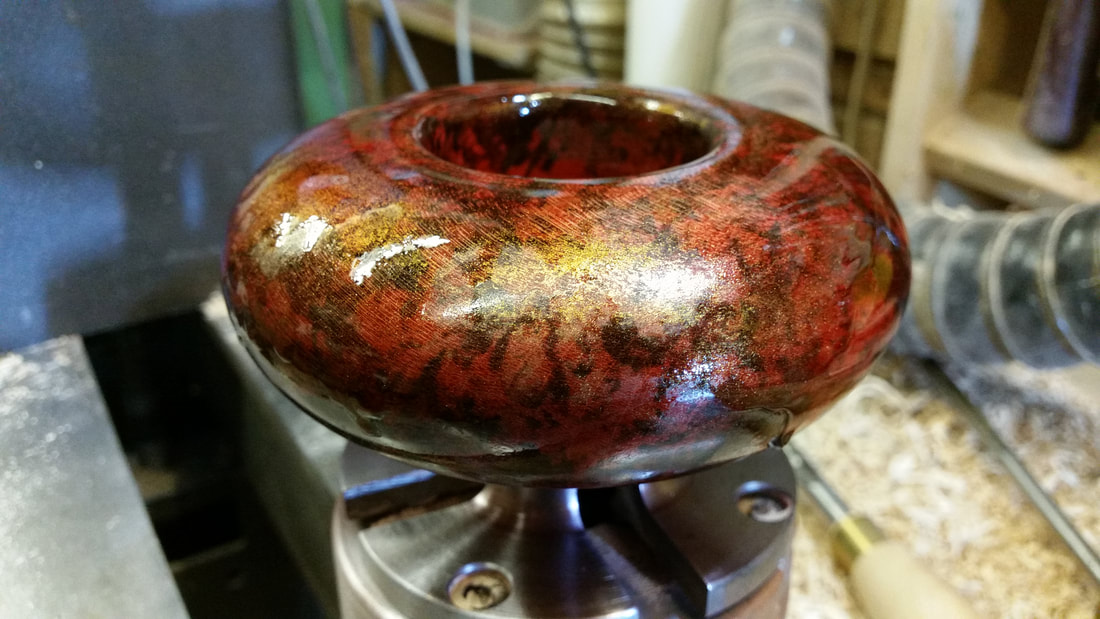
Well, two months between blog posts appears to be my standard now! What happens to all the time I think I have? While I may not have written a blog post for a while, I've still been getting some turning done, and been trying out some new techniques...with varying degrees of success. Since the start of the year, I've made eight new YouTube videos, and I'm working on another one as I type this - more of that later. The big news is that I passed 1000 subscribers to my YouTube channel, which feels great. There's a giveaway connected to this that ends on Sunday 25th February. If you want a chance to win, the link is here: 1K Giveaway! At the moment, the winner will receive this when I've finished it... If you've been following my videos, you'll know this texturing and colouring came about after a disastrous attempt to paint a finish with brushes - clearly showing my artistic talents need a lot of nurturing. 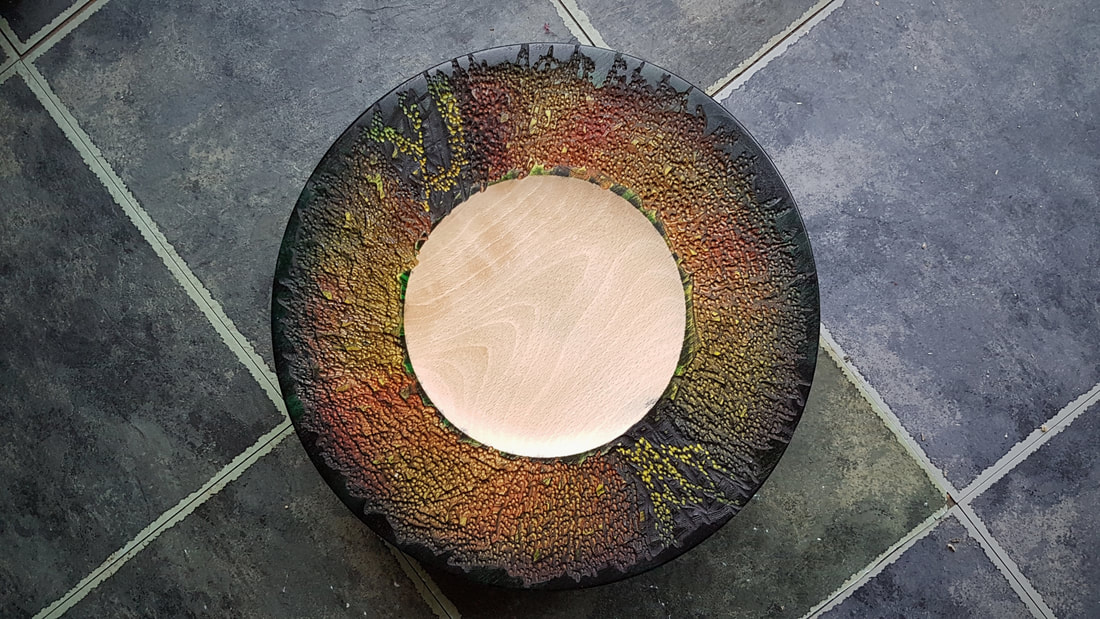 It was power tools I turned to when my paint brush skills proved wanting, and it's power tools I've been relying on this weekend for my latest platter. I've been interested in doing some piercing on hollow forms for a while but my Simon Hope hollowing tool is still in its packet in a drawer waiting to be used. So I decided to pierce a platter rim instead. Piercing itself didn't take too long, but the sanding afterwards took ages. I hand-sanded so much that my phone doesn't recognise my thumb print anymore! There's still work to do as so far it's only been sprayed black. I'm going to add some iridescent paint to bring some life and sparkle to it (I hope!). Finally, I'm turning my mind to the demos I'll be doing this year. The first one is in April in Yorkshire - only two month's away, and judging by the speed two months pass, that will come round very quickly. If you have any ideas for how to make watching paint dry, let me know! Happy turning...even if your workshop ends up as messy as mine... 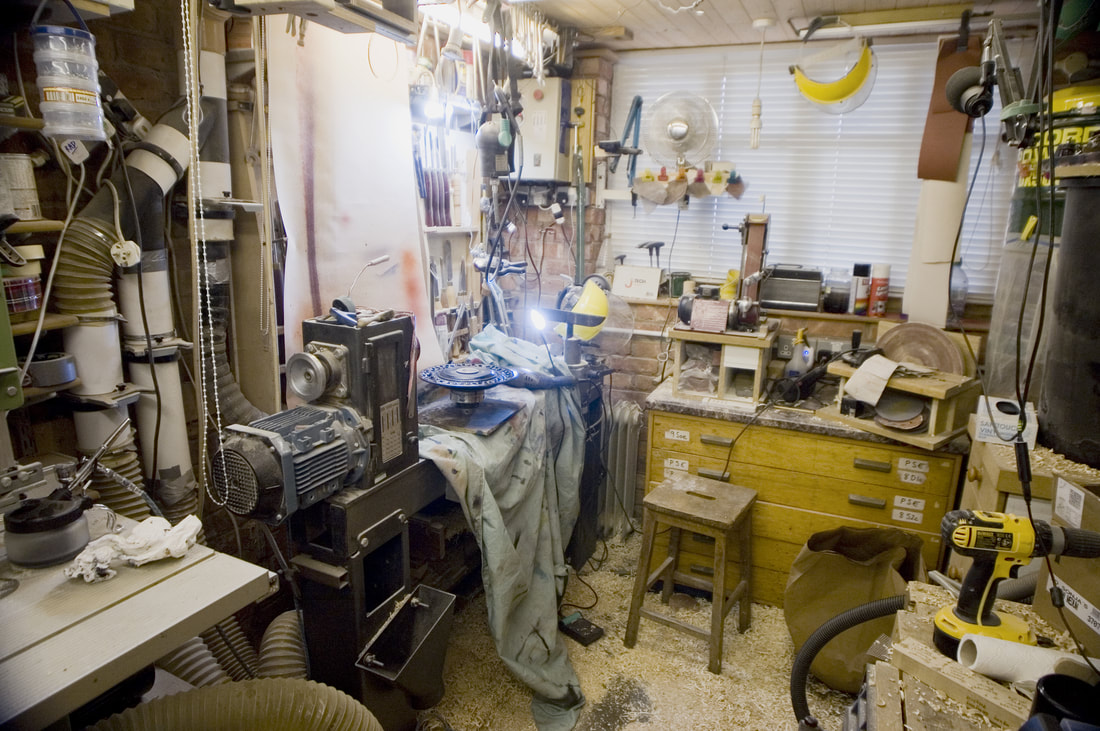 Time flies - probably rather faster than I can manage to make shavings, judging by the length of time between this and the previous blog post! It's been so long, I've forgotten what I've done in the interim. I do know that today I spent a huge amount of time fiddling around with a green screen set up in my workshop. Was it worth it? Maybe not, but it was fun! And it was frustrating too...I mucked about with lights and software settings for ages and still didn't get a perfect result. However, it was just about good enough to use in my latest video - Metallic Effect Ash Bowl. I'd love to know what you think of it. This was the first time I'd used Martin Saban-Smith's Intrinsic Colours, water-based stains. I enjoyed using them and the end result was really pleasing.
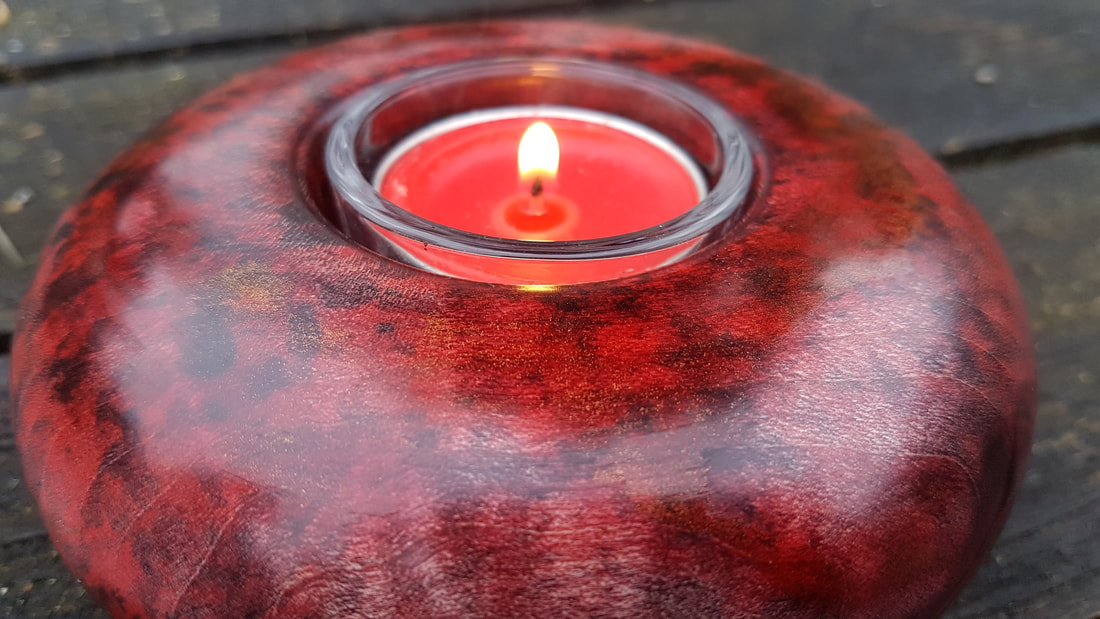
I've also made a few festive tealight holders - great for table centrepieces. Similar to the ash bowl above, these were coloured with stains and metallic paints. It was fun to do something a bit smaller than my usual twelve inch platters, but I can't wait to try out some of the techniques on wide platter rims.
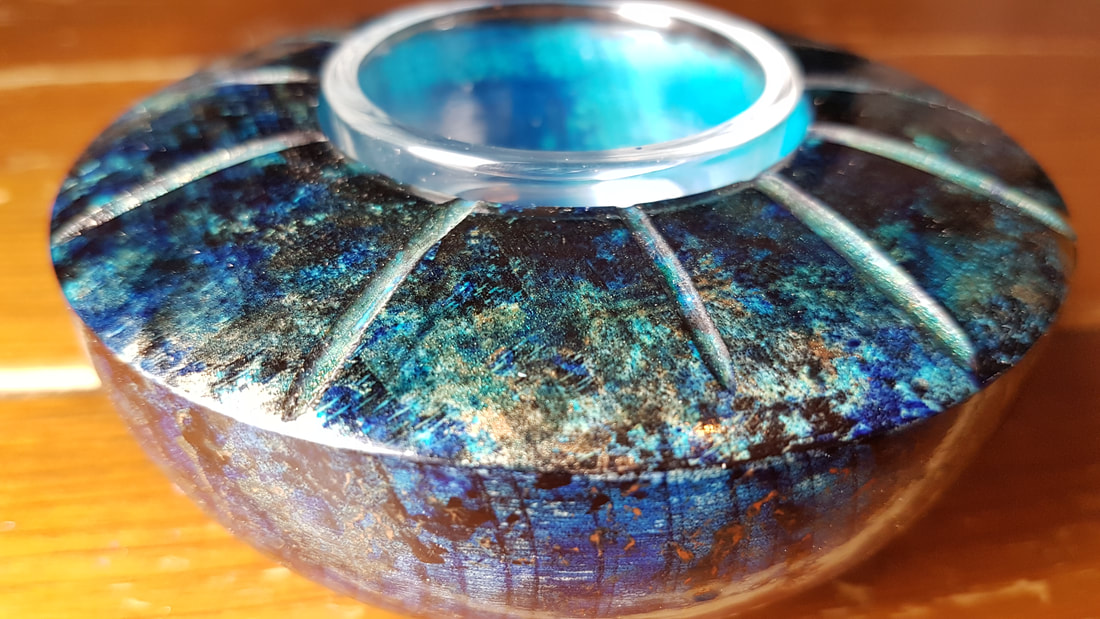
I also had a go at mixing up the colouring in textured pieces by using strongly contrasting colours in the textured part of a platter rim next to the surface of the rim. This came out much better than it looked like it was going to at one point! However, that's not an unusual experience with the colouring experiments I've tried - just keep going until you get what you like, as you can always sand it off and start again (the blue tealight holder is the third version!). 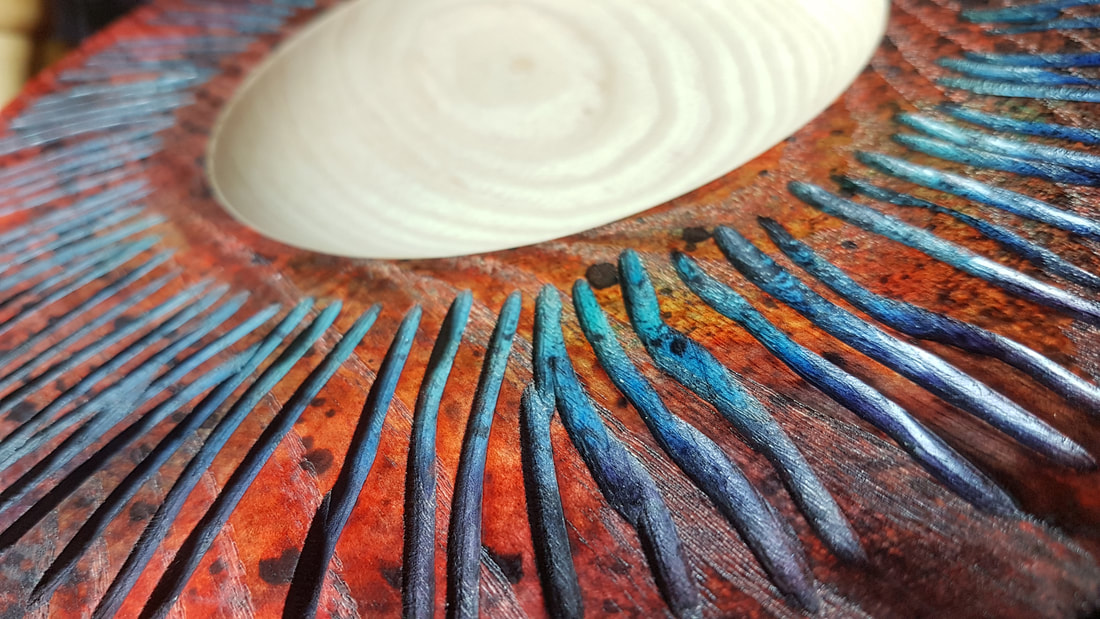 And the year is ending on a high with a mention in the latest Chestnut Products newsletter - with a link to my website, no less - and a set of Intrinisic Colours to try out from Martin Saban-Smith.
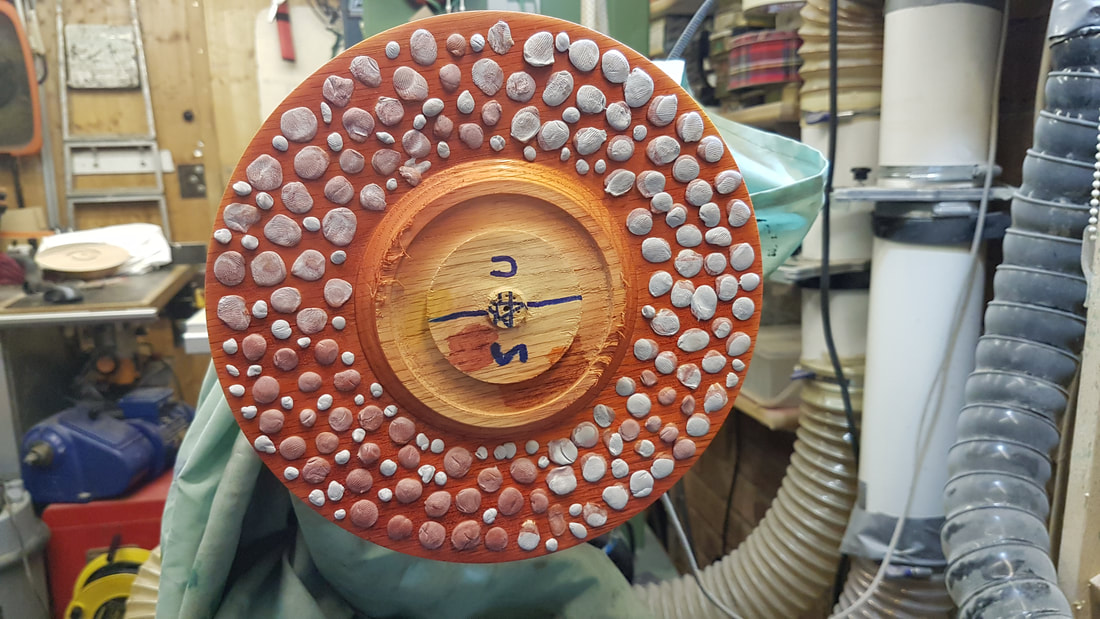
When I started this website in April of this year, it was mainly to support the first time I'd put my work up for sale in one of the Artist Open Houses in Brighton in May. I'm ending the year with 30+ YouTube videos (and subscribers are going up - over 700 now!), I've done a couple of club demos, and have three more lined up for next year, and I've got a notebook with a load of ideas I haven't even tried yet. I've just signed up to Artists Open Houses for the new year - if you're a venue looking for turned wood art this May or next Christmas, please get in touch! Have a great end to the year. Well, October has flown by....here we are at the end of British Summer Time, fireworks are going off sporadically in the area I live, and in a couple of days' time we'll have to take cover from the trick or treating marauders... Today, I got time in my workshop and I decided to have a go at using blutack as a masking agent with spirit stains. I also decided to use the time to see what difference was made by using sanding sealer before applying the stains. The instructions say to use the stains on unsealed wood. For my experiment I sealed one half of the blank only. There were definitely some differences in the finish, as pictures will show later.
|
Stewart is...Keeping sane and finding creative expression in a piece of spinning wood Archives
April 2022
Categories |


 RSS Feed
© 2017-2024 Stewart Furini Woodturning. All rights reserved.